Whenever a user connects to their institution using the Belvo API, we create a Link. A Link is a set of encrypted credentials, for example the username and password, that is associated with the user. You will always need to first register a Link before being able to access information specific to that end user.
We really recommend you make use of the external_id parameter when creating links as this will allow you to have your own unique identifier for a link in your own database. Check out our Link creation best practices article for more information.
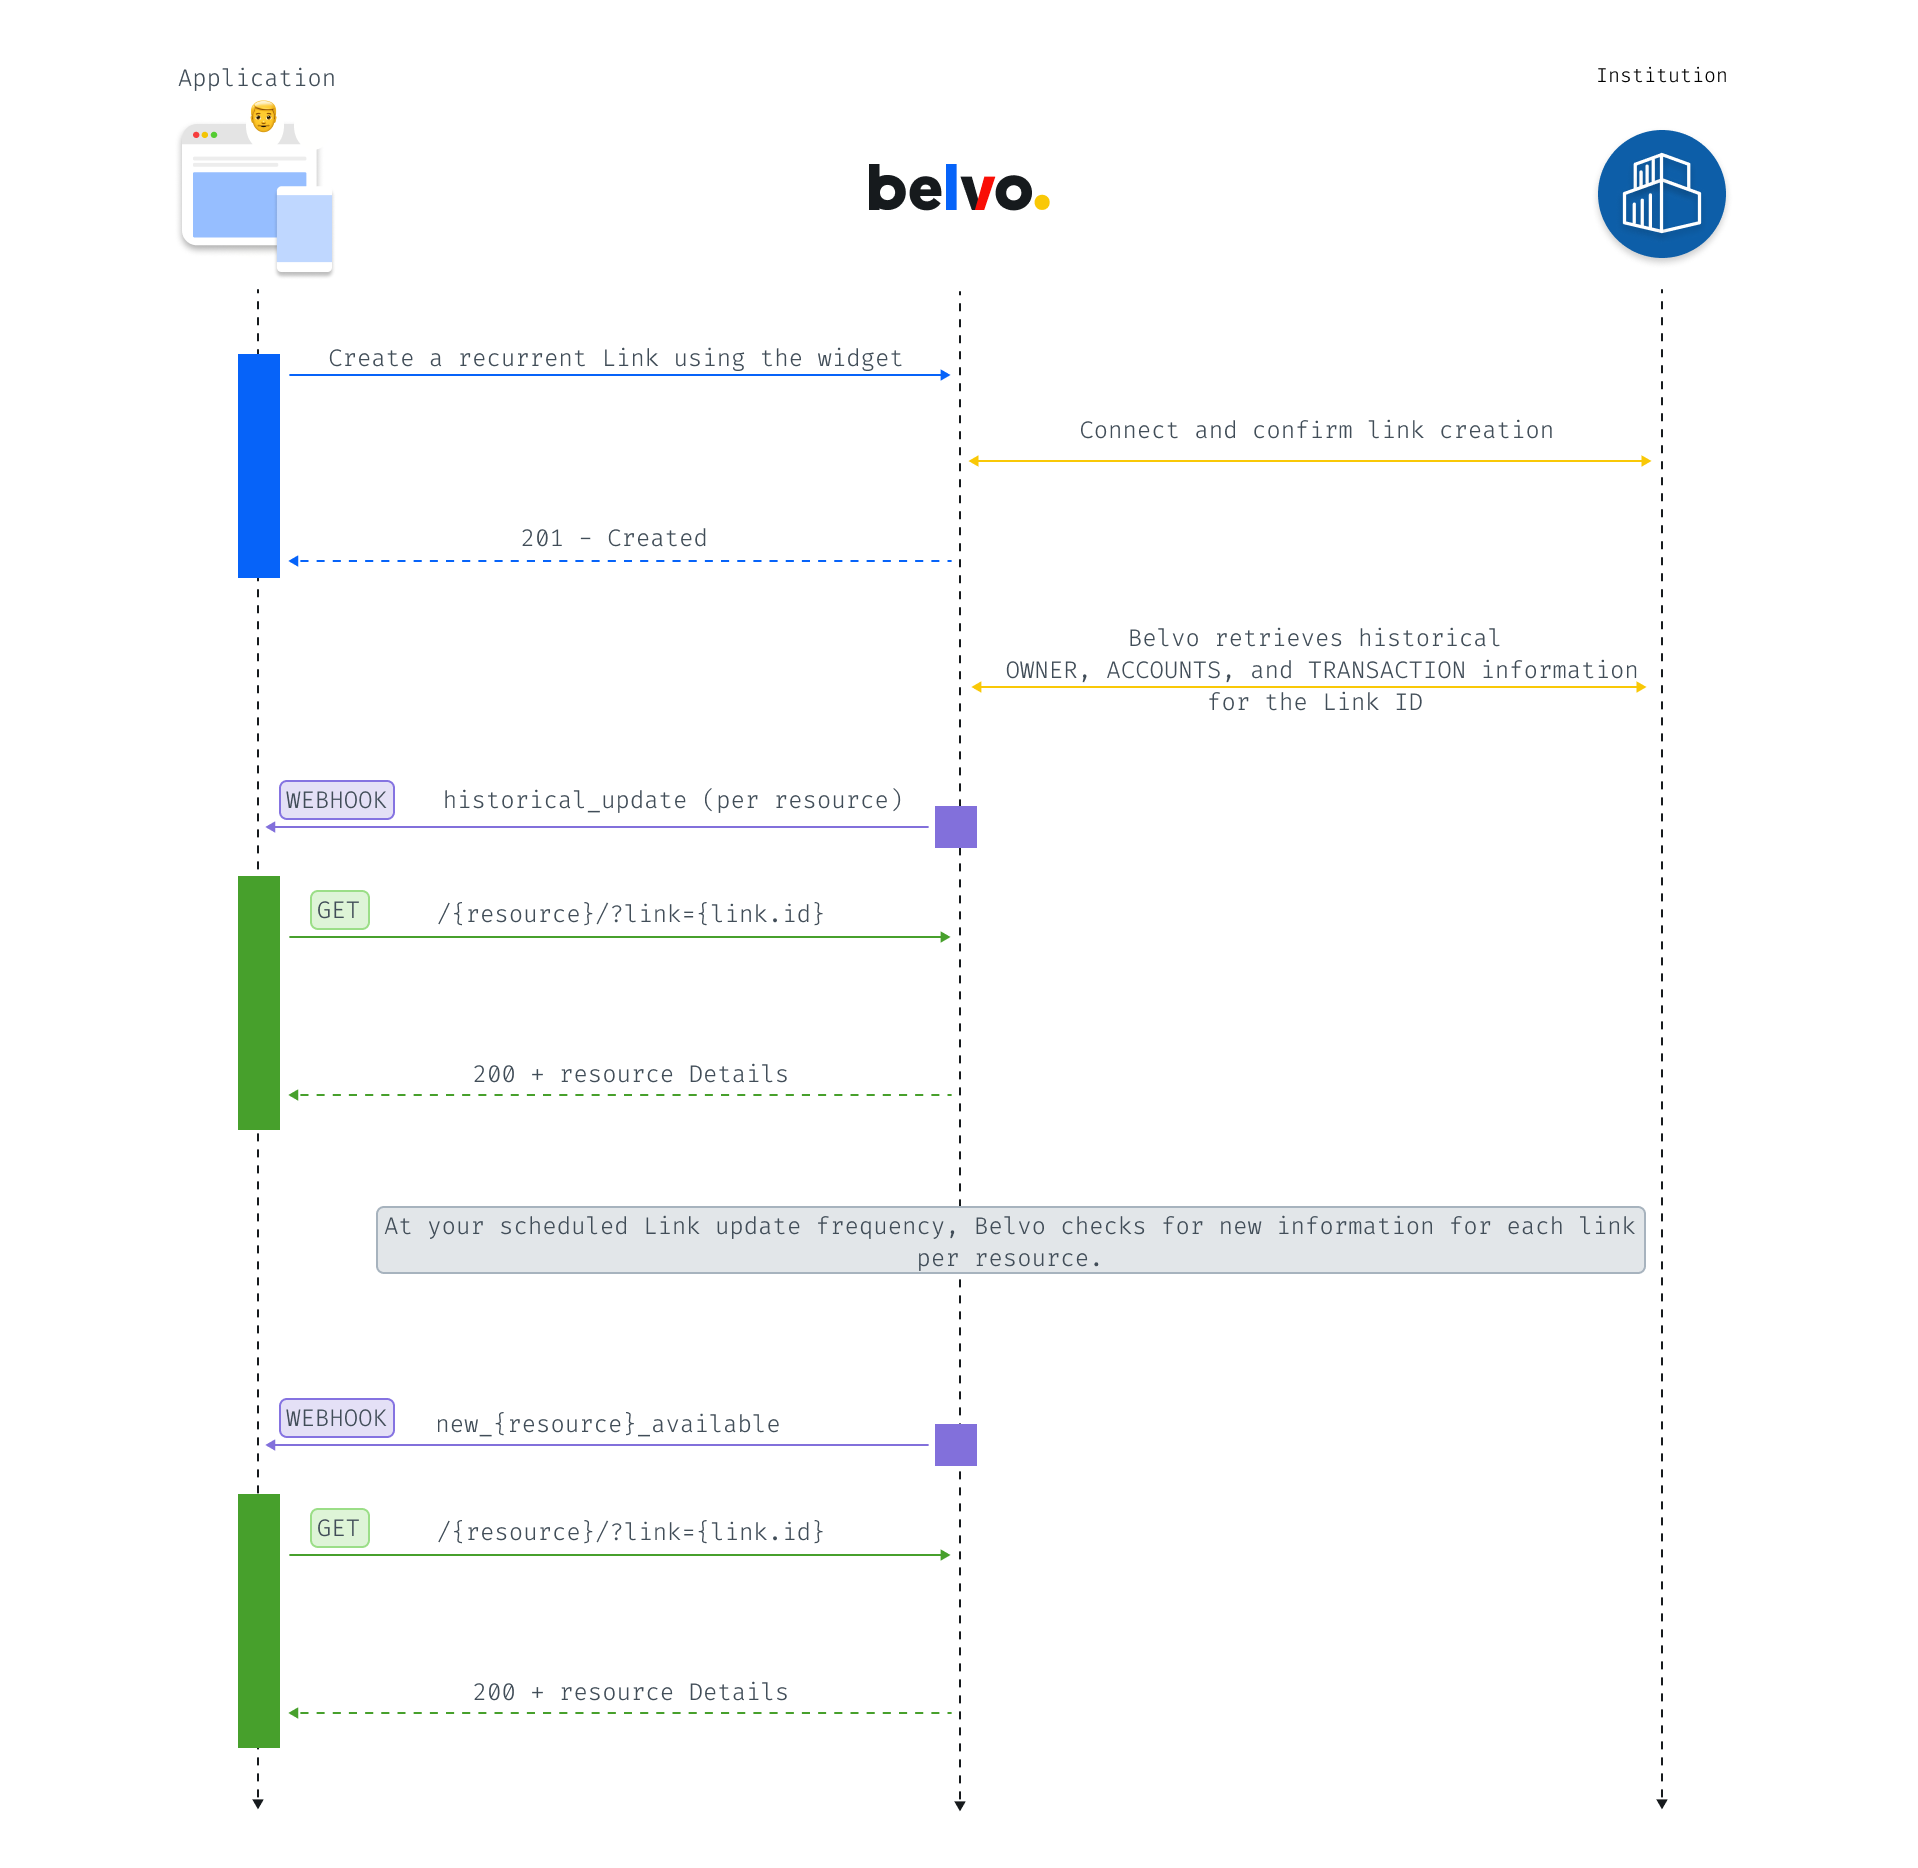
With recurrent links, Belvo automatically refreshes information weekly and notifies you via webhook so you always have up-to-date data. Then, when you receive the webhook, you can use GET requests to the List or Detail endpoints to instantly access up-to-date information, without needing to connect to the institution.

When you create a recurrent link, Belvo automatically retrieves key information about the Link ID. Once we have the information, we'll send you a historical webhook event indicating that you can make a GET request for that information.
We recommend you don't make POST calls immediately after a link is created. Instead, wait for a historical update webhook which indicates that Belvo has scraped the data and then you can make a GET request to retrieve the information (the webhook is sent soon after a link is created). If you make a GET request before you receive a historical webhook, you will receive responses with empty data fields or duplicated information.
When using recurrent links, you must ensure that you comply with the data privacy regulation of the country you operate in. Additionally, we recommend that you inform users that their credentials will be used daily in order to cyclically retrieve up-to-date data.
By default, recurrent links are automatically refreshed once every seven days. However, you can change the update frequency of your recurrent links to every:
- 6 hours (four times per day)
- 12 hours (twice a day)
- 24 hours (once a day)
- 30 days (once a month)
Note: with the 30-day refresh rate, we distribute the link updates between day 1 and day 20 of the given month. The refresh date for each monthly recurrent link is initially assigned randomly between the 1st and the 20th of the month. If the following link updates are successful then the subsequent refreshes for this link will occur on the same day each month. Links are not scheduled to be updated after the 20th of the month to reserve some time for potential re-tries. For more information, check out our Help Center article on Monthly recurrent links.
To change your refresh rate or discuss refresh rate pricing, just email our sales team at sales@belvo.com, and they'll get right to it.
With recurrent links, we update the following information according to your chosen frequency:
| Institution | Initial information | Refreshed information |
|---|---|---|
| Banking (Brazil) | All account, transaction, and owner information |
|
| Fiscal (Mexico) | All invoices, the tax compliance statuses, tax returns, and the tax status. |
|
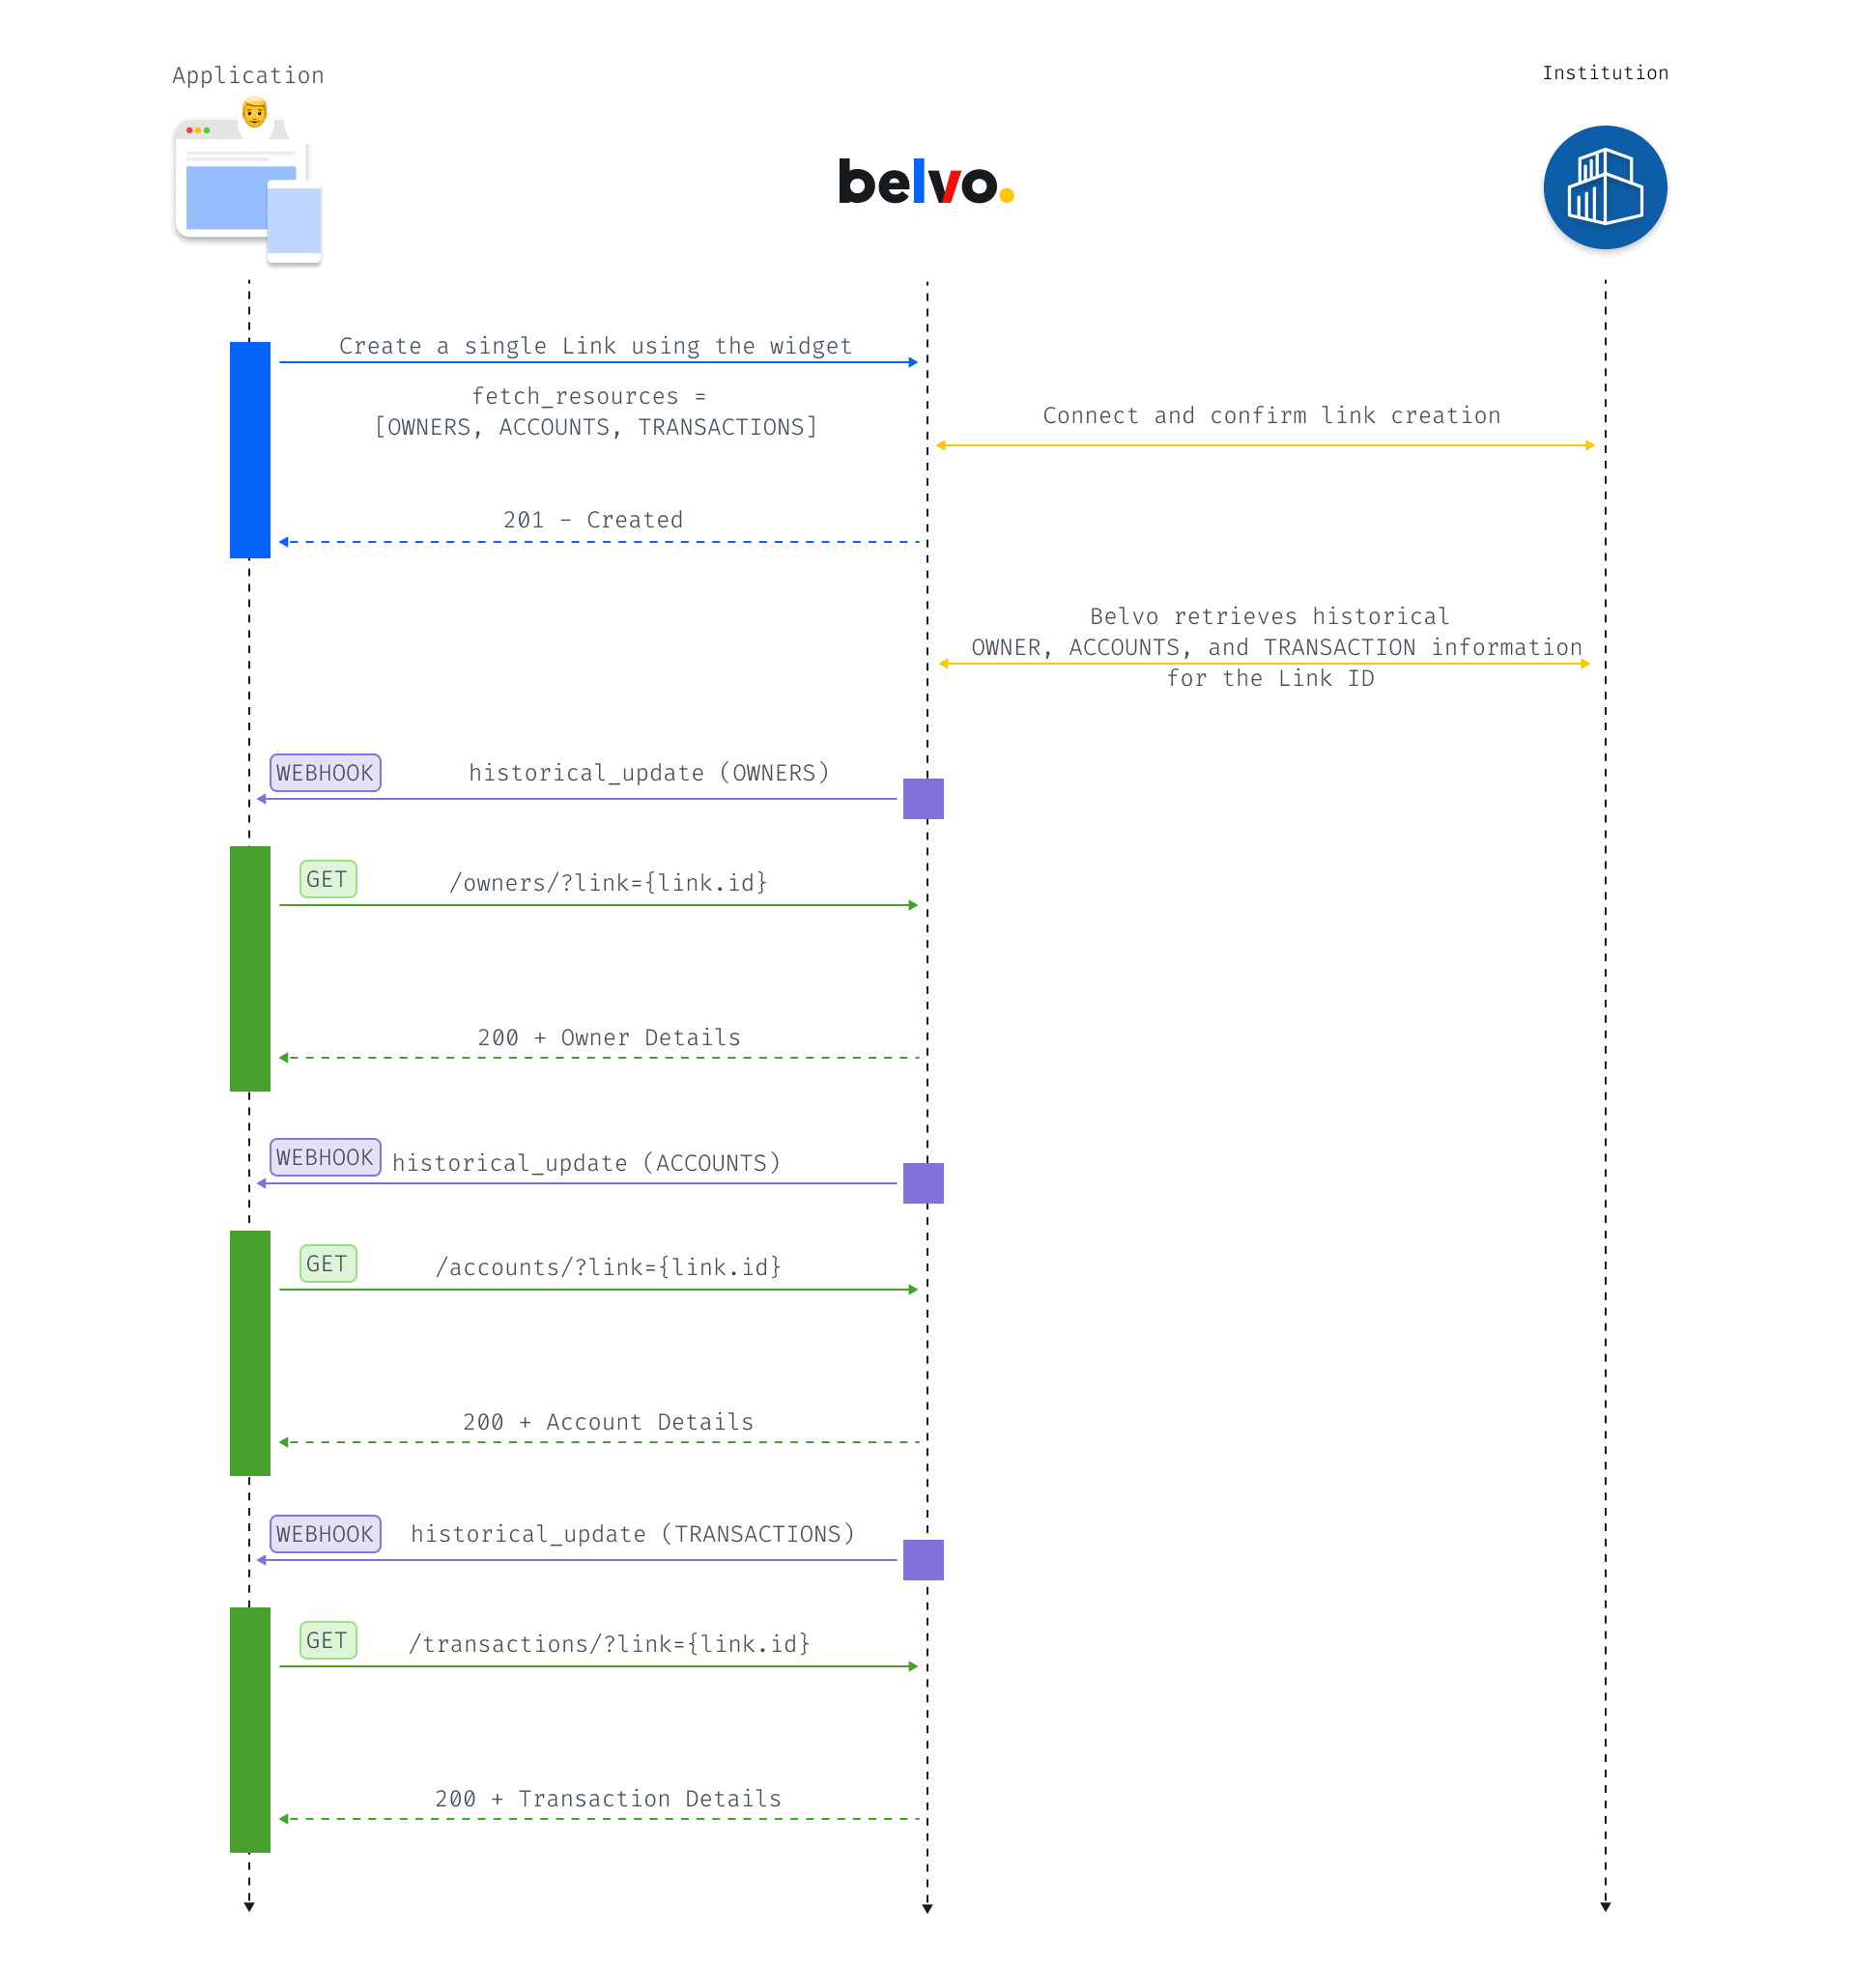
Single links are used to perform ad hoc data access to accounts, owners, transactions, and so on. For example, you can use it when you want to do an underwriting process to assess risk before lending money.
For single links, you need to pass the fetch_resources parameter when creating and then listen for webhooks once the historical data has been asynchronously extracted.

A link can have different statuses, which reflect if the link is operational or if an action is needed to restore the link.
| Status | Description | Action |
|---|---|---|
valid | A valid link is a fully working link. | None 🎉 |
invalid | An invalid link means that the credentials are no longer valid. | You need to ask your user to update their credentials in order for the link to be valid again. 💡Use the Connect widget in update mode to ask your user to provide a new password. |
unconfirmed | An unconfirmed link means that the link was never created successfully. A common situation where this can occur is when a user was prompted to for an MFA token but never provided it. | You need to resume the link creation process with a token to complete the link creation. |
token_required | A token_required link means that a previously valid link now requires a new token. | You need to resume the link update process with a token. 💡Use the Connect widget in update mode to ask your user to provide a new password. |
You can find the status of a link by making one of the following queries and checking the value of the status field in the JSON response:
Use the List all links method to get all the links you currently have access to. You can perform filtering on the responses to return just the links that have a certain status. In the example below, we filter the response to just have invalid links.
# Filter by invalid links
curl --request POST 'https://sandbox.belvo.com/api/links/?page_size=1000&status=invalid'\
  -u SECRET_ID:SECRET_PASSWORD

# Get the full list of links
curl --request POST 'https://sandbox.belvo.com/api/links/?page_size=1000'\
  -u SECRET_ID:SECRET_PASSWORD
If you want to know about applying filters in your queries, see our Filtering responses article.
Use the Get a link's details method to get the details for a specific link.
curl --request GET 'https://sandbox.belvo.com/api/links/{id}' \
  -u SECRET_ID:SECRET_PASSWORD
Where:
{id}is the ID of the link. For example:c70a25d4-d8ad-9999-b59e-b8f57f0e7123.
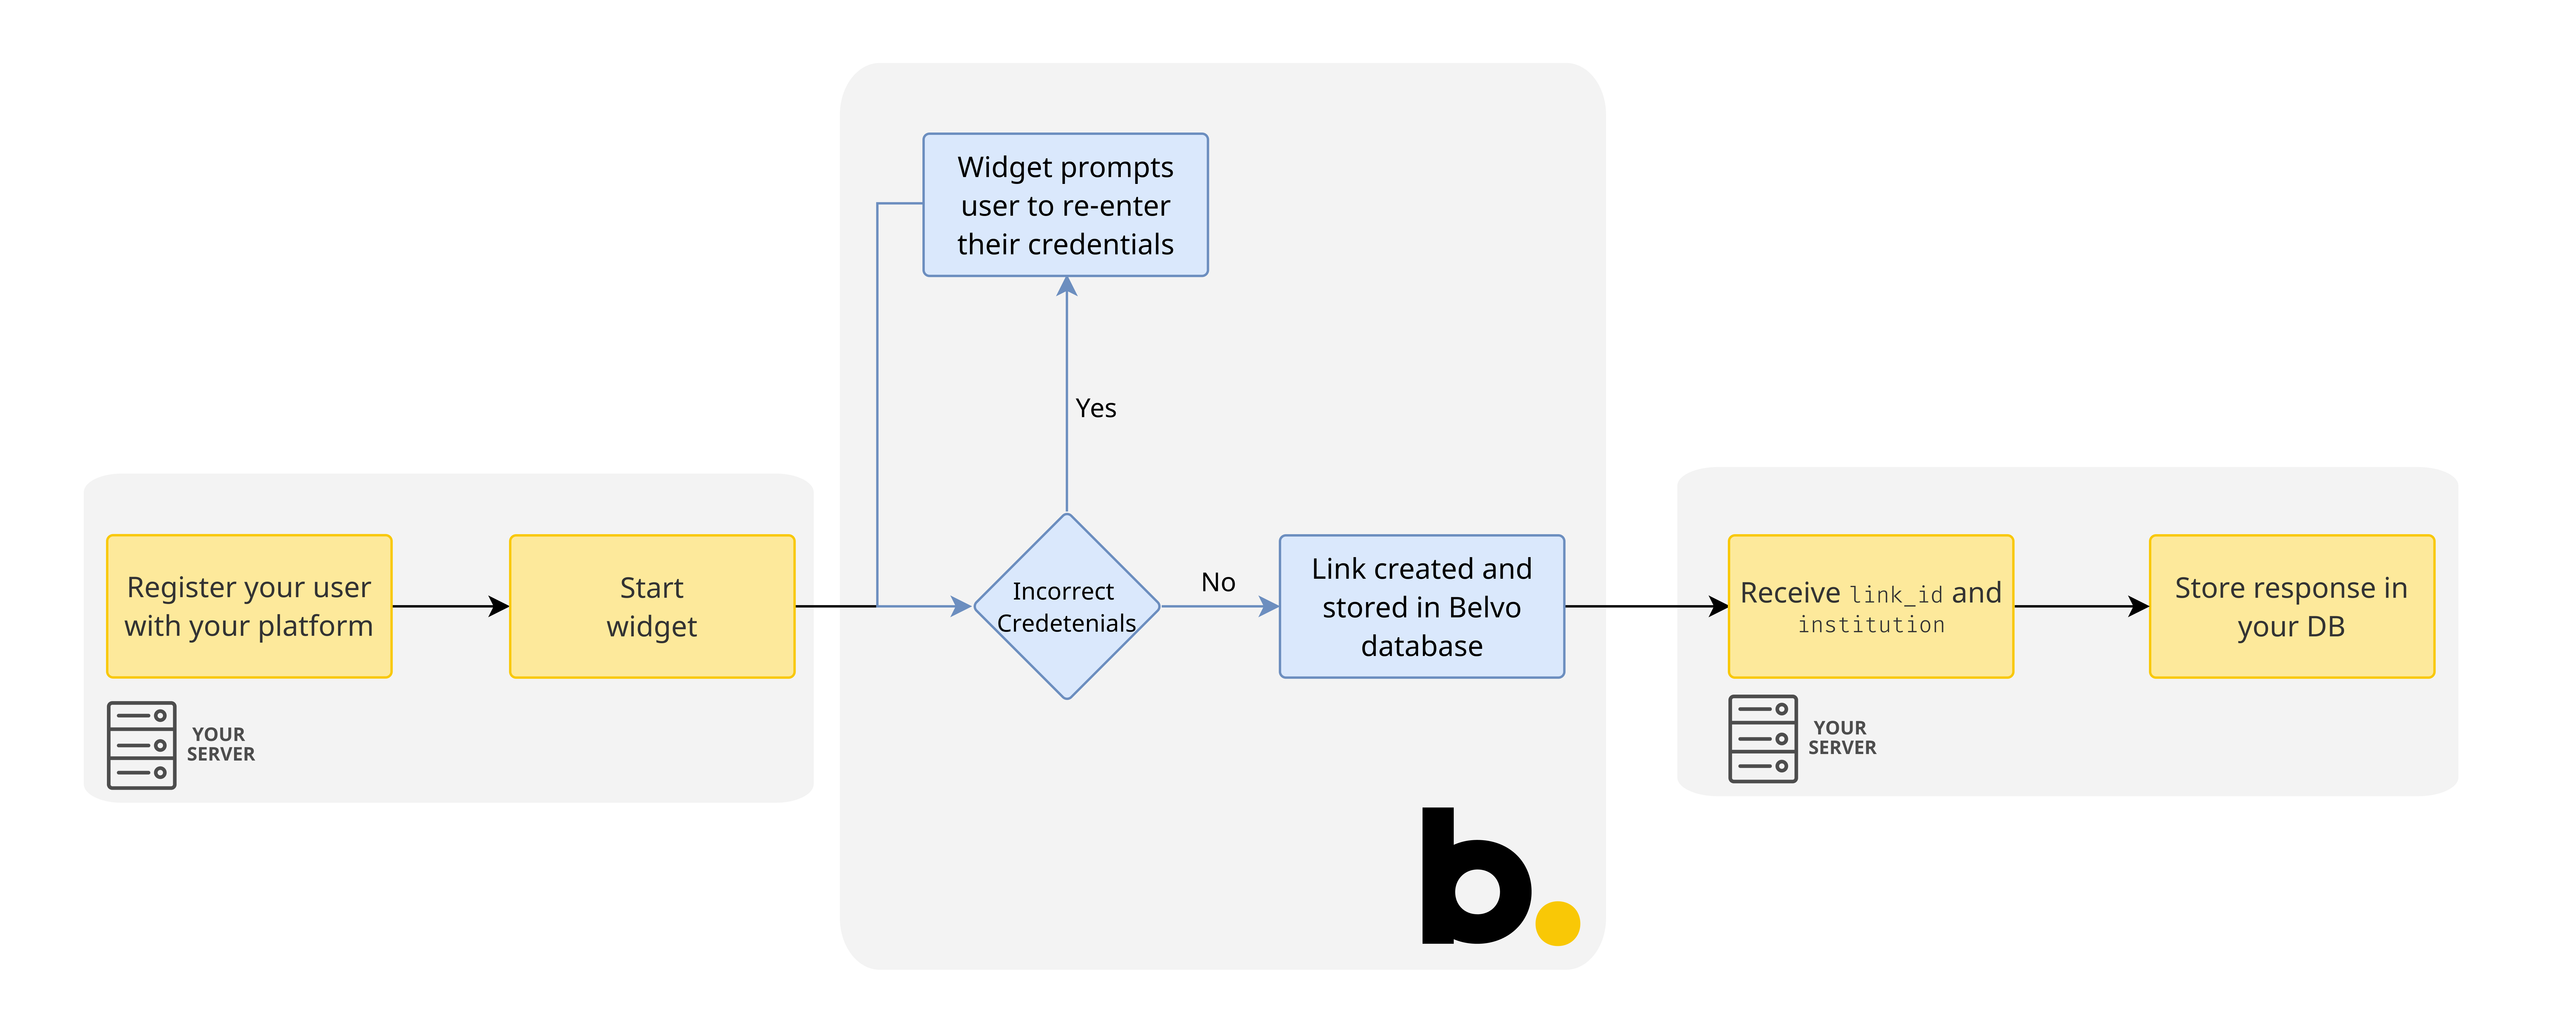
When you're setting up your link creation flow:
- Make sure you first register your users with your platform.
- Use the Connect Widget to create your links.
- Store the received
link_idin your database.

By first registering your user in your platform, you have a way to associate a user with a created link in your database.
An orphan link is a link that was created but has not been associated with a user in your database.
Orphan links can occur when:
- you do not register your user first with your platform.
- your user closes your application (mobile or browser) during a successful connection process.

To recover orphan links created due to the user closing your application, we recommend using the external_id parameter as an additional identifier for your link in Belvo's database.
You can use the optional external_id parameter when creating a new link to provide an additional unique identifier within the Belvo system. This is particularly useful as you can later make a request to Belvo's Links endpoint and filter for all the links associated to an external_id.
By using external_id and filtering, you can:
- list all the links related to a user.
- get the latest status of each link, and if needed, prompt the user to update their token or their credentials for an institution.
- identify any orphan links for that user and then associate the
link_idin your database.
The external_id that you provide:
- should be a unique ID for each user in your database.
- must be at least three characters long.
- can only be composed of letters, numbers, dashes (
-), and underscores (_). - cannot contain any personally identifiable information about the user (email, name, phone number, credit card number, and so on).
If you use any personally identifiable information in your external_id, Belvo will set the external_id to null. As such, you will not be able to filter your links by that external_id.
To use the optional external_id parameter, we highly recommend the following flow:
- Register your users first with your platform and create a unique ID for that user in your database.
- Use the unique ID as the value of the
external_idparameter when creating a link. - Use the Connect Widget to create your links.
Then, as required, you can periodically call /links/?external_id={user's unique ID in your system} and identify any orphan links or links that need to have their status updated.

Duplicated links occur when:
- the user tries to connect their account to the same institution with the same credentials a second time.
- you are not storing the
link_idin your database. - the user closes your application (mobile or browser) during a successful connection process.
To help you avoid link duplication, have a look at our helpful tips below.
Tip #1 - Register your users first
Make sure that you register your user with your platform first. This way, you will always have a way to associate created links with a user in your database and keep track of what accounts they have already connected.
Tip #2 - Use external_id
When your user starts a new session on your platform:
Request all links associated for the user:
/links/?external_id={user's unique ID in your system}.Associate any orphan links that have
status=validwith your user in your database and let your user know that the link was created successfully.
If the status of the link is not valid, you can either:
- delete the link and request the user to connect their account again.
- update the status of the link using Hosted Widget in Update Mode.
This way, you will ensure that you will not have any orphan links and that all the links associated with a user have a valid status.
Tip #3 - Use the widget's callback metadata
After receiving the Success callback from the widget, you can use the link ID to retrieve information about the link. The information from the link can then be compared to the existing links that this user already created in your database (Tips #1 and #2) and utilize this to detect potential duplicates. For example, you can compare a combination of the account’s institution_id, account name, and account number to determine whether your user has previously linked an account to your application.
Tip #4 - Show already-connected accounts
Before your users open the widget, in your UI, display a list of accounts that they have already connected (to find all the accounts they have, you can use the external_id in combination with the metadata you receive from the Widget in Tip #3). By showing this information, your users will avoid linking the same account again (and you avoid duplicated Links).
Tip #5 - Use institution_user_id to keep track of links
When your user connects their account, we return the institution_user_id, which is a unique 44-character string that can be used to identify a user at a given institution. You can use this identifier to compare in your database whether or not your user has previously connected this account, and if you want to avoid duplicated links, you can choose to replace the existing link.id in your database.
Example:
- Your user connects their account to an institution and you receive the following link
idandinstitution_user_id:
{
	"id": "link-id-1",
	"institution_user_id": "ooE7XJWEKypZJR603ecaWYk-8Ap0oD8Nr1pBQ4eG9c="
}- Your user connects the same account again using the same credentials and you receive:
{
	"id": "link-id-2",
	"institution_user_id": "ooE7XJWEKypZJR603ecaWYk-8Ap0oD8Nr1pBQ4eG9c="
}- Comparing the
institution_user_idin your database, you see that this is the same account. If you would prefer to not have duplicated links in your database, you can replace thelink-id-1withlink-id-2in your database and uselink-id-2for your future requests.
Belvo offers an opt-in feature designed to prevent duplicated links from being created, ensuring that your users never connect the same account twice to your application. If your user has already successfully connected their account and they try to connect the same account again:
- Integrations using Belvo's Connect Widget - your users will receive an error in the Widget and your backend will receive an Error Event Callback.
- Integrations not using Belvo's Connect Widget - you will receive a 400 duplicated API error.
In the situation where your user has previously attempted to create a link but never finished the flow (resulting in the link status being set to unconfirmed), when they try to connect the same account again Belvo will allow for the link to be created. This feature ensures that you can still retrieve vital user information and provides your users' the ability to still connect their accounts.
If you'd like to opt-in for this feature, just contact our support team and they'll gladly help you out! In order to use this feature, you may be required to alter your integration to use the external_id parameter on link creation.
The Trigger a historical update for a link method is currently in Open Beta for all clients to use. We encourage you to try it out and provide feedback.
You can programmatically trigger a historical update for a link's data by using our Trigger a historical update for a link method. This is useful when you need to get the latest data for specific resources without waiting for the next scheduled update of a recurrent link or you want to trigger an update for a single link.
When you make a request to this endpoint, you can specify which resources (ACCOUNTS, TRANSACTIONS, and so on) you want to update. If you don't specify any, we will update all resources supported by the institution.
Please be aware that to prevent duplicate requests, this endpoint has a 10-minute cooldown period per link. If you try to refresh the same link within this window, you'll receive a 409 Conflict error.
We strongly recommend you use our Connect Widget to handle link creation. Our widget automatically handles the entire link creation process, including all the MFA token scenarios (inputless, numeric, QR code, or text).

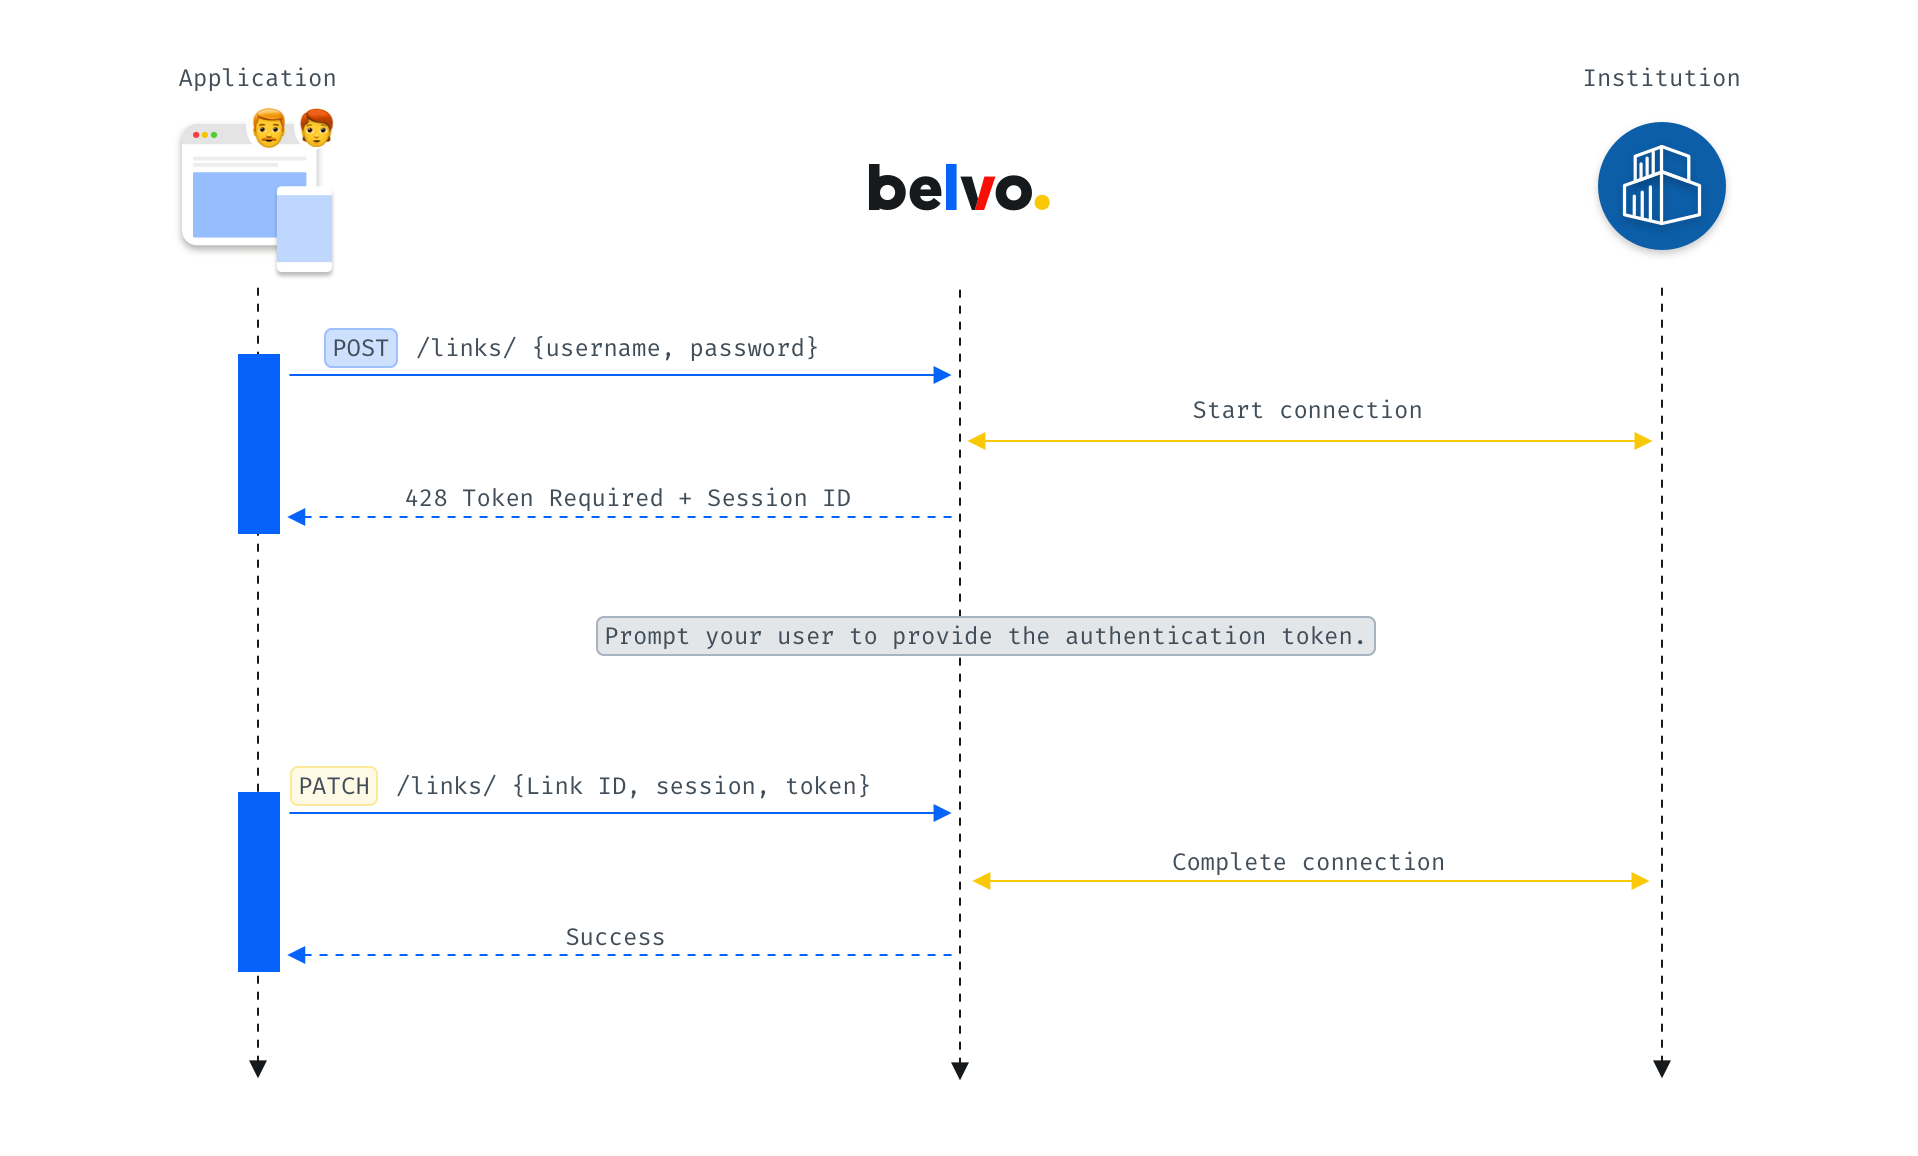
The general flow for MFA is:
- You make a POST request to the institution to retrieve some data or to create a link.
- Belvo sends a 428 Token Required response, detailing which MFA method is needed to complete the request.
- You prompt the user to input the required authentication token.
- You make a Complete PATCH request for the given resource with the link ID, session ID, and user-provided authentication token.
- Belvo sends a 201 Success message.
Below you can see an annotated payload for a 428 Token Required response. For detailed information regarding the token_generation_data object, please see the MFA Methods section.
[
    {
        "code": "token_required", // Response code
        "message": "A MFA token is required by the institution to login", // Human-readable description of the response.
        "session": "be7a15d5f0b84d8ea60f6c12cb2a7b32", // Session ID (required in your PATCH request).
        "expiry": "720", // The duration in which the end user needs to provide a token, in seconds.
        "link": "449e388c-812b-4798-8743-7d11efb6becf", // Link ID of the end-user (required in your PATCH request).
        "token_generation_data": {

			// Contains details on the MFA Method required (inputless, numeric, qr, text).
			// Please see the relevant section
			// below for detailed information.

        },
        "request_id": "b7a3a5b3a3a2b6aa28f4cc98d55cf1f1" // The ID of the request (used for debugging purposes).
    }
]In the token_generation_data object, we include a expect_user_input parameter. When set to false, this indicates that the user just needs to, for example:
- Scan a QR code to complete the authentication (similar to how you authenticate the Whatsapp desktop app).
- Confirm the login on another device (similar to password-less authentication)
The Inputless MFA method requires your user to generate an authentication token using their device and provide you with the generated token. The 428 Token Required response that you receive will have inputless in the type field. In your UI, just prompt your user to add their input token.
[
    {
        "code": "token_required",
        "message": "A MFA token is required by the institution to login",
        "session": "be7a15d5f0b84d8ea60f6c12cb2a7b32",
        "expiry": "720",
        "link": "449e388c-812b-4798-8743-7d11efb6becf",
        "token_generation_data": {
            "instructions": "Use your app or device to generate a token",
            "type": "inputless", // <-- The MFA method is inputless.
            "value": null, // <-- No value is passed.
          	"expects_user_input": true // <-- Indicates that the user needs to provide you data to complete the authentication.
        },
        "request_id": "b7a3a5b3a3a2b6aa28f4cc98d55cf1f1"
    }
]
After you have received your end user's token, you make a PATCH request.
The numeric MFA method requires that your end user inputs a code in their device in order to receive the authentication token. The code that they will need to input in their device is passed in the 428 Token Required response, where the type field will be numeric and the value field will contain the code that the user needs to input in their application. In your UI, you can display this code to your user so that they can then enter it in their application.
The numeric code included in the 428 response is valid for up to 30 or 60 seconds (depending on the institution). If your user provides their generated code after this time, the institution returns another 428 response with a new numeric code.
[
    {
        "code": "token_required",
        "message": "A MFA token is required by the institution to login",
        "session": "731b8a5ed45245b3a2bd595382016b5e",
        "expiry": "60",
        "link": "04134743-73f9-41c3-a6dd-06cee3fab627",
        "token_generation_data": {
            "instructions": "Use this code to generate the token",
            "type": "numeric", // <-- The MFA method is numeric.
            "value": "703837", // <-- The code to display to the user.
            "expects_user_input": true // <-- Indicates that the user needs to provide you data to complete the authentication.
        },
        "request_id": "63cece2a9374b06495a16da5b2265793"
    }
]
After you have received your end user's token, you make a PATCH request.
The QR Code MFA method requires that your end user scans a QR code in order to retrieve the authentication token.
The QR code that they will need to scan with their application is passed in the 428 Token Required response, The code that they will need to input in their device is passed in the 428 Token Required response, where the type field will be qr and the value field will contain the BASE64 string representation of the QR Code. You can parse this string to generate the QR code and display it to your user in your UI.
The QR code included in the 428 response is valid for up to 30 or 60 seconds (depending on the institution). If your user provides their generated code after this time, the institution returns another 428 response with a new QR code.
[
    {
        "code": "token_required",
        "message": "A MFA token is required by the institution to login",
        "session": "433142d512854cf6b10a3ccc08f3fa7d",
        "expiry": "60",
        "link": "66a5cf30-512d-4830-b616-7dd7d6ecf09f",
        "token_generation_data": {
            "instructions": "Scan this QR code to generate the token",
            "type": "qr", // <-- The MFA method is a QR code.
            "value": "...", // <-- BASE64 string to parse and generate QR code.
          	"expects_user_input": true // <-- Indicates that the user needs to provide you data to complete the authentication
        },
        "request_id": "ce05c19b323c1caae6445aff5d4229f8"
    }
]
After you have received your end user's token, you make a PATCH request.
The Text MFA method requires your user to answer a security question. The 428 Token Required response that you receive will have text in the type field. In your UI, just prompt your user to add answer their security question and use the provided string as the value of the token parameter in your PATCH request.
[
    {
        "code": "token_required",
        "message": "A MFA token is required by the institution to login",
        "session": "be7a15d5f0b84d8ea60f6c12cb2a7b32",
        "expiry": "720",
        "link": "449e388c-812b-4798-8743-7d11efb6becf",
        "token_generation_data": {
            "instructions": "Answer the question to proceed",
            "type": "text", // <-- The MFA method is an answer to a security question .
            "value": "Where were you born?", // <-- Security question user needs to answer.
          	"expects_user_input": true // <-- Indicates that the user needs to provide you data to complete the authentication
        },
        "request_id": "b7a3a5b3a3a2b6aa28f4cc98d55cf1f1"
    }
]
After you have received your end user's token, you make a PATCH request.
When you are required to provide a token during the connection process, you will receive a 428 Token Required response and instructions on which MFA method is needed. After you have prompted the user to input their authentication token, you must send a PATCH request to the Resume endpoint of the resource you want to access.
For example:
curl -X PATCH \
  https://sandbox.belvo.com/api/links/ \
  -H 'Content-Type: application/json' \
  -H 'cache-control: no-cache' \
  -d '{
    "session": "{sessionId}",
		"link": "{linkId}",
    "token": "{userToken}"
}' \
  -u SECRET_ID:SECRET_PASSWORD
Where:
{sessionId}is the value in thesessionfield you receive in the 428 Token Required response.{linkId}is the value in thelinkfield you receive in the 428 Token Required response.{userToken}is the authentication token (including an answer to a security question) that your user provides.