The content of this article refers to the multi-region widget (applicable for Mexico). If you wish to operate in Brazil, please see our Connect Widget for Regulated OFDA.
# Introduction
Belvo offers a plug-and-play Connect Widget solution, both for web and mobile applications, that provides a secure and optimized authentication process for each institution. The Connect Widget is the smoothest way for your users to connect their bank account within your application. It is compatible with our aggregation products: Banking, Employment, and Fiscal.
If you'd like to test out how it works, check out our Widget Demo.
Here is a preview of the Connect widget on a demo website:

The end-to-end integration involves your frontend and backend. Below is an overview of how you can create links with the Connect widget.
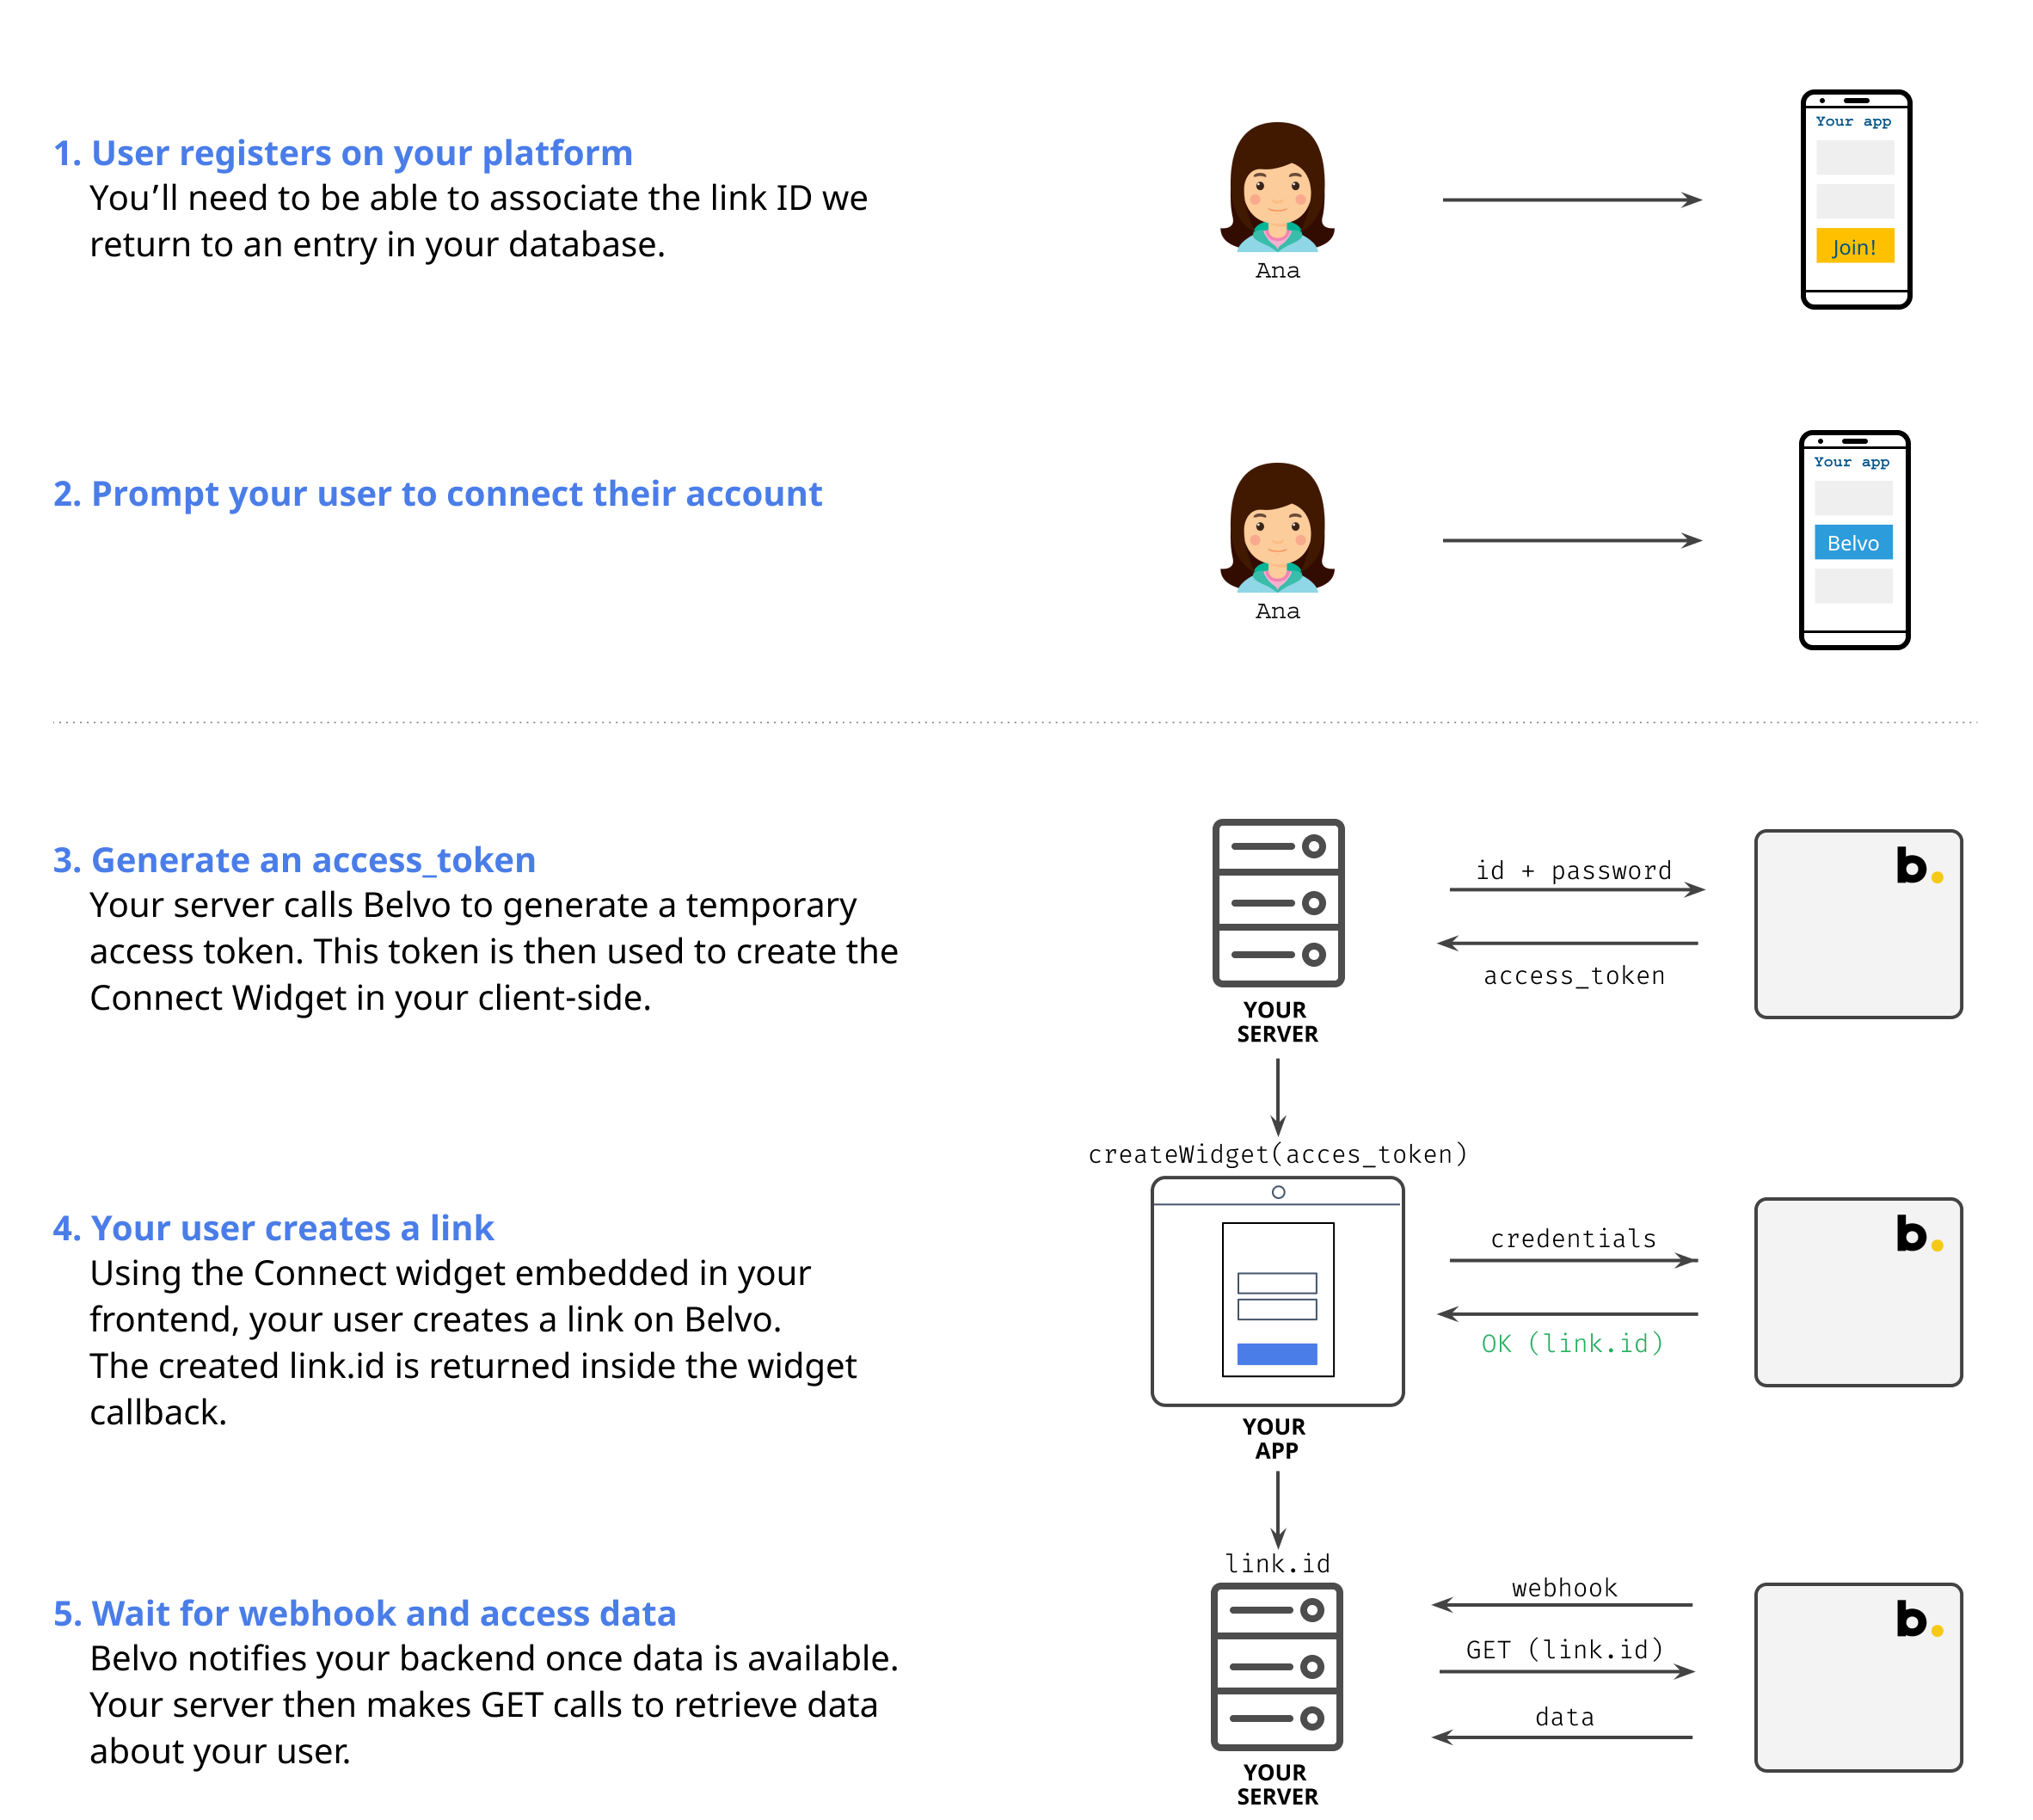
As you can see, your client-side and server-side will be involved in the Connect Widget flow. Here is an end-to-end example to illustrate each side's responsibility:
- Your user clicks a Add a bank account button within your application.
- Your frontend calls your backend to request an
access_tokenfrom Belvo. - Your backend calls Belvo to get an
access_token. - Belvo returns a valid
access_tokento your backend. - Your server returns the
access_tokento your frontend. - Your frontend starts the widget using the
access_token. - The user navigates through the Connect Widget and creates a valid link to their institution.
- Belvo returns the newly created link
idvia an event callback to your frontend. Belvo will then start asynchronously retrieving the historical data for the link. - Belvo sends a webhook to your backend once data is available for each core resource.
- Your backend retrieves the data using a GET call, passing the link
idas a query parameter. - Belvo returns the info to your backend and forwards it to your frontend.
- Your user sees their financial data within your service.
❗️ Server-side calls
Our API cannot be used directly from the frontend. The access token and any other API request you need should be handled from your backend (server-side).
To embed the widget code in your application, the following code elements to the page where the Connect Widget should appear (if you are working in Angular, React, or Vue, just select the relevant code tab for you).
<!-- To embed the Connect widget statically, just use the following code. -->
<head>
  ...
  <script src="https://cdn.belvo.io/belvo-widget-1-stable.js" async></script>
  ...
<head>
<body>
  ...
  <div id="belvo"></div> <!-- anywhere inside the body -->
  ...
</body>


<!-- To embed the Connect widget dynamically, just use the following code in your <body>. -->

<body>
...
  <script type="text/javascript">
     const widget = document.createElement('script');
     widget.setAttribute('src','https://cdn.belvo.io/belvo-widget-1-stable.js');
     document.body.appendChild(widget);
  </script>
...
</body>
import { Component, OnInit } from '@angular/core';
// Implement the OnInit interface to be able to load the script
@Component({
selector: 'app-root',
template: `
<div class="content" role="main">
<div id="belvo"></div>
</div>
`,
styleUrls: ['./app.component.css']
})
export class AppComponent implements OnInit {
title = 'widget-angular';
// implemented method
ngOnInit(): void {
loadScript('https://cdn.belvo.io/belvo-widget-1-stable.js');
}
}
// Please add the code from Step 3 here.import './App.css';
import { useEffect } from "react";
function App() {
useScript('https://cdn.belvo.io/belvo-widget-1-stable.js');
return (
<div id="belvo" />
);
}
export default App;
// Hook
function useScript(src) {
useEffect(
() => {
// Create script
const node = document.createElement('script');
node.src = src;
node.type = 'text/javascript';
node.async = true;
node.onload = createWidget
// Add script to document body
document.body.appendChild(node);
},
[src] // Only re-run effect if script src changes
)
}<template>
<div id="app">
<div id="belvo" />
</div>
</template>
<script>
export default {
name: 'App',
mounted () {
// Executing the function to load the widget after mount, since we need
// the template to be loaded
this.loadScript('https://cdn.belvo.io/belvo-widget-1-stable.js');
},
methods: {
// Please add the code from Step 3 here.
}
}
</script>🚧 Make sure you include the reference to
https://cdn.belvo.io/belvo-widget-1-stable.js. Otherwise, the widget will not load in your app!
👍 Customizing the
access_tokenWhen you request your
access_token, you can pass additional parameteres to customize the appearance of your widget. For more information, see our Branding and customization guide.
❗️ Server-side request
The
access_tokenrequest must be done from your server-side in order to protect your API keys secretId and secretPassword). So if you're using a framework like Vue or React, please make sure that you generate the request from your server-side.
In order for the widget to appear to your end users, you need to generate an access_token in your server-side and send it to Belvo. Once we receive the request, you'll receive an object with two elements: access and refresh. Pass the value of the access element to your client-side, and you'll be able to start the widget.
The returned values are valid for 10 minutes and can be sent to your frontend to start the Connect Widget. We invalidate the token as soon as your user successfully connects their account.
To generate an access_token, simply make a call from your server-side to Belvo (see the example below):
curl -X POST \
  https://sandbox.belvo.com/api/token/ \
  -H 'Content-Type: application/json' \
  -H 'Host: sandbox.belvo.com' \
  -d 'See payload example below'
{
"id": "SECRET_ID",
"password": "SECRET_PASSWORD",
"scopes": "read_institutions,write_links",
"fetch_resources": ["ACCOUNTS", "TRANSACTIONS", "OWNERS"],
"credentials_storage": "store",
"stale_in": "300d"
}📘 Scopes
Remember to pass the
scopesparameter when generating your access token otherwise the widget will not start correctly. Those scopes are necessary to give the right permissions to the token for the widget to work.
"scopes": "read_institutions,write_links"
After you make your call, Belvo returns an object from which you'll need the value from the access key. You'll send this value to your client-side so that the widget can actually start.
{
  "access": "{access_token_for_widget}", // You'll need this value to send to your client-side
  "refresh": "{refresh_token}"
}
✳️ OK! Now that you can generate access_token, you can start the widget!
Using this access_token you can now start the Connect widget:
// Code to be included within your <script type="text/javascript"> tag

function successCallbackFunction(link, institution) {
	// Do something with the link and institution,
	// such as associate it with your registered user in your database.
}

function onExitCallbackFunction(data) {
	// Do something with the exit data.
}

function onEventCallbackFunction(data) {
	// Do something with the event data.
}

// Function to call your server-side to generate the access_token and retrieve the your access token
function getAccessToken () {
  // Make sure to change /get-access-token to point to your server-side.
  return fetch('/get-access-token', { method: 'GET' })
    .then(response => response.json())
    .then((data) => data.access)
    .catch(error => console.error('Error:', error))
}

function openBelvoWidget(accessToken) {
	belvoSDK.createWidget(accessToken, {

		// Add your startup configuration here.

		callback: (link, institution) => successCallbackFunction(link, institution),

	}).build();
}

getAccessToken().then(openBelvoWidget) // Once the access token is retrieved, the widget is started.
// Insert the following code after AppComponent() class from Step 1.
async function createWidget() {
// Function to call your server-side to generate the access_token and retrieve the your access token
function getAccessToken() {
// Make sure to change /get-access-token to point to your server-side.
return fetch('http://localhost:3001/auth/token', {
method: 'GET'
})
.then(response => response.json())
.then((data) => data)
.catch(error => console.error('Error:', error))
}
const successCallbackFunction = (link, institution) => {
// Do something with the link and institution,
// such as associate it with your registered user in your database.
}
const onExitCallbackFunction = (data) => {
// Do something with the exit data.
}
const onEventCallbackFunction = (data) => {
// Do something with the exit data.
}
const config = {
// Add your startup configuration here.
callback: (link, institution) => successCallbackFunction(link, institution),
onExit: (data) => onExitCallbackFunction(),
onEvent: (data) => onEventCallbackFunction()
}
const { access } = await getAccessToken();
// @ts-ignore
window.belvoSDK.createWidget(access, config).build();
}
function loadScript(src: string) {
let node = document.createElement('script');
node.src = src;
node.type = 'text/javascript';
node.async = true;
// Assign the callback which will create the Widget
node.onload = createWidget;
document.getElementsByTagName('head')[0].appendChild(node);
}// Insert the following code after useScript() function from Step 1.
async function createWidget() {
// Function to call your server-side to generate the access_token and retrieve the your access token
function getAccessToken() {
// Make sure to change /get-access-token to point to your server-side.
return fetch('http://localhost:3001/auth/token', {
method: 'GET'
})
.then(response => response.json())
.then((data) => data)
.catch(error => console.error('Error:', error))
}
const callback = () => {}
const successCallbackFunction = (link, institution) => {
// Do something with the link and institution,
// such as associate it with your registered user in your database.
}
const onExitCallbackFunction = (data) => {
// Do something with the exit data.
}
const onEventCallbackFunction = (data) => {
// Do something with the exit data.
}
const config = {
// Add your startup configuration here.
callback: (link, institution) => successCallbackFunction(link, institution),
onExit: (data) => onExitCallbackFunction(),
onEvent: (data) => onEventCallbackFunction()
}
const { access } = await getAccessToken();
window.belvoSDK.createWidget(access, config).build()
}// Insert the following code after mounted() function from Step 1.
async createWidget() {
// Function to call your server-side to generate the access_token and retrieve the your access token
function getAccessToken() {
// Make sure to change /get-access-token to point to your server-side.
return fetch('/get-access-token', {
method: 'GET'
})
.then(response => response.json())
.then((data) => data)
.catch(error => console.error('Error:', error))
}
const successCallbackFunction = (link, institution) => {
// Do something with the link and institution,
// such as associate it with your registered user in your database.
}
const onExitCallbackFunction = (data) => {
// Do something with the exit data.
}
const onEventCallbackFunction = (data) => {
// Do something with the exit data.
}
const config = {
// Add your startup configuration here.
callback: (link, institution) => successCallbackFunction(link, institution),
onExit: (data) => onExitCallbackFunction(),
onEvent: (data) => onEventCallbackFunction()
}
const { access } = await getAccessToken();
window.belvoSDK.createWidget(access, config).build()
},
loadScript(src) {
const node = document.createElement('script');
node.src = src;
node.type = 'text/javascript';
node.async = true;
// Assign the callback which will create the Widget
node.onload = this.createWidget;
// Add script to document body
document.body.appendChild(node);
}
}👍 Customize the branding and startup configuration
You can add custom branding as well as configure what information (countries, institutions) the widget should display when it is started.
Please see our dedicated guides for more information:
You need to implement callback functions to handle the success, error, and exit data that Belvo sends.
Belvo's API can send you:
- Success data, which contains the link_id and the institution that a user connected to.
- Event data, which contains information about different events, such as errors, that occur during the use of the widget.
- Exit data, which contains information about when a user exits the widget, if they encountered any errors, and what institution they had selected.
👍 Event and exit real-world use cases
We strongly recommend that you implement event logging functions to handle Belvo's event and error data for diagnostic purposes.
We regularly see our clients use these functions to create logs. What they do is capture the entirety of the response and then store it for troubleshooting purposes.
Once a user successfully connects their account, Belvo sends a data object with the institution and the link ID (which you'll need in your further requests for data).
{
	"link": "link_id",
	"institution": "the_institution_that_the_user_connected_to"
}| Parameter | Description |
|---|---|
link String | The link_id created in the widget |
institution String | The name of the institution for this created link |
To handle this data, you need to create a callback function.
🚧 Mandatory
You must create a callback function to handle the object that Belvo sends back. Otherwise, the widget will not start and you will receive an error message.
Here is an example of success callback usage:
<script type="text/javascript">
  function successCallbackFunction(link, institution) {
      // Do something with the link and institution,
      // such as associate it with your registered user in your database.
	}

function openBelvoWidget(accessToken) {
  ...
    belvoSDK.createWidget(accessToken, {
    ...
      callback: (link, institution) => successCallbackFunction(link, institution),
    ...

    }).build();
}
</script>When users encounter certain events in the widget, we'll send you some data to explain what's going on. The data object will contain an eventName, request_id, and meta_data object.
{
  "data": [
    {
      "eventName": "ERROR",
      "request_id": "UUID",
      "meta_data": {
        "error_code": "login_error",
        "error_message": "Invalid credentials provided to login to the institution",
        "institution_name": "bancoazteca_mx_retail",
        "timestamp": "2020-04-27T19:09:23.918Z"
      }
    }
  ]
}
{
  "data": [
    {
      "eventName": "WARNING",
      "request_id": "UUID",
      "meta_data": {
        "warning_code": "institution_disabled",
        "warning_message": "The institution is temporarily unavailable.",
        "institution_name": "bancoazteca_mx_retail",
        "timestamp": "2020-04-27T19:09:23.918Z"
      }
    }
  ]
}
{
  "data": [
    {
      "eventName": "PAGE_LOAD",
      "meta_data": {
        "page": "/institutions", // Page that the user is directed to
        "from": "/consent", // Page where the user was previously
        "institution_name": "" // Note: This field only appears AFTER they've selected an institution
      }
    }
  ]
}
event_name
A string representing the name of event that has just occurred in the widget.
| Event type | Description |
|---|---|
ERROR | When a recoverable error occurred in the widget, see the error_code and error_message in the meta_data. |
WARNING | When a user tries to connect to an institution that is currently unavailable. See the warning_code and warning_message in the meta_data for more information. |
PAGE_LOAD | When a user progresses to the next screen in the widget. |
request_id
A string used to uniquely identify the error.
🚧 Store the request_id
When implementing your Belvo integration, make sure that you account for storing the request_id when you receive an error. This way, when you provide our engineers the ID, they can troubleshoot the issue quickly and get you back up and running.
meta_data
An object containing more information about the event that has just occurred in the widget.
The meta_data object can have the following properties:
| Parameter | Description |
|---|---|
error_code | The error code that the user encountered. See the Exit callback for the list of possible error codes. |
error_message | The error message that the user encountered. See the Exit callback for the list of possible error messages. |
institution_name | The selected institution |
timestamp | A timestamp of when the event occurred |
<script type="text/javascript">
  function onEventCallbackFunction (data) {

    // Do something with the event data
  }

  function openBelvoWidget() {
    ...
    belvoSDK.createWidget(access_token, {
      ...
      onEvent: (data) => this.onEventCallbackFunction(data),
      ...
    }).build();
  }
</script>When users decide to close the widget, we'll send you some data to explain what's going on. The data object will contain a last_encountered_error object and meta_data object.
👍 Real-world use case
Monitoring for the Exit callback is useful as based on the event, you can redirect your user to a particular screen after they close the widget.
{
  "data": [
    {
      "last_encountered_error": {
        "message": "Invalid credentials provided to login to the institution",
        "code": "login_error"
      },
      "meta_data": {
        "institution_name": "erebor_mx_retail",
        "step": "abandon-survey"
      }
    }
  ]
}
last_encountered_error
The last_encountered_error object is only sent if an error occurred. See the table below for a list of possible error codes and their messages.
| Error code | Error message |
|---|---|
institution_down | The financial institution is down, try again later |
login_error | The possible error messages for a login_error are: - Invalid credentials provided to login to the institution The user account is locked, user needs to contact the institution to unlock it The user account access was forbidden by the institution Impossible to login, something unexpected happened while logging into the institution. Try again later. A MFA token is required by the institution, but it’s not supported yet by Belvo. Login not attempted due to invalid credentials Missing credentials to login to the institution |
too_many_sessions | Impossible to login, a session is already opened with the institution for these credentials |
unexpected_error | Belvo is unable to process the request due to an internal system issue or to an unsupported response from an institution |
meta_data
The meta_data object is sent whenever a user exits the widget. See the table below for a list of possible values.
| Parameter | Description |
|---|---|
step | Sent when the user exits the widget at the initial screen. The value of the parameter is always abandon-survey. |
institution_name | Sent when the user exits the widget after selecting an institution. The value will be Belvo's institution code, for example banamex_mx_retail. |
Here is an example of onExit usage:
<script type="text/javascript">
  function onExitCallbackFunction (data) {

    // Do something with the Exit data
  }

  function openBelvoWidget() {
    ...
    belvoSDK.createWidget(access_token, {
      ...
      onExit: (data) => this.onExitCallbackFunction(data),
      ...
    }).build();
  }
</script>Once your user successfully connects their bank account, you'll receive the link_id in the success event. Belvo will then send you webhooks informing you when information is ready for the link. For more information, see:
The Connect widget can be configured in “update mode” to restore a link that has temporarily stopped working because:
- the password connected with the Link has been changed by the user
- a new MFA token is required
For more information, check our guide to Update a link using the Connect widget.