For mobile-native and web-based applications, we've created a hosted version of our widget that significantly simplifies your development and integration process. All it requires is for you to create a webview in your application and some knowledge of handling deeplink redirects.
This page provides reference documentation on what information to pass when starting your hosted widget as well as the possible events you can receive from the widget.
This guide walks you through:
- Generating an access token
- Starting the hosted widget
- Handling callback events
- Retrieving data
For mobile-first applications, we've developed a specialized App2App flow that improves the user experience when they are connecting their account within your application. For more details, check out our Hosted Widget App2App Flow for OFDA.
To display the widget to your end users, generate an access token on your server and send it to Belvo. Once we receive the request, you'll receive an object with two keys: access and refresh. Pass the value of the access key when starting the hosted widget.
The returned values are valid for 10 minutes and we invalidate the token as soon as a user successfully connects their account.
To generate an access token, simply make a call from your server-side to Belvo:
curl -X POST \
  https://sandbox.belvo.com/api/token/ \
  -H 'Content-Type: application/json' \
  -H 'Host: sandbox.belvo.com' \
-d 'see example payloads below'{
"id": "YOUR_SECRET_ID",
"password": "YOUR_SECRET_PASSWORD",
"scopes": "read_institutions,write_links,read_consents,write_consents,write_consent_callback,delete_consents",
"stale_in": "300d",
"fetch_resources": ["ACCOUNTS", "TRANSACTIONS", "OWNERS"],
"widget": {
"purpose": "Soluções financeiras personalizadas oferecidas por meio de recomendações sob medida, visando melhores ofertas de produtos financeiros e de crédito.",
"openfinance_feature": "consent_link_creation",
"callback_urls": {
"success": "your_deeplink_here://success",
"exit": "your_deeplink_here://exit",
"event": "your_deeplink_here://event"
},
"consent": {
"terms_and_conditions_url": "https://www.your_terms_and_conditions.com",
"permissions": ["REGISTER", "ACCOUNTS", "CREDIT_CARDS", "CREDIT_OPERATIONS"],
"identification_info": [
{
"type": "CPF",
"number": "76109277673",
"name": "Ralph Bragg"
}
]
}
}
}{
"refresh": "eyJhbGciOiJIUzUxMiIsInR5cCI6IkpXVCJ9.eyJ0b2tlbl90eXBlIjoicmVmcmVzaCIsImV4cCI6MjMzNDY1MDY5MiwiaWF0IjoxNzEyNTcwNjkyLCJqdGkiOiIxMDAxMTg4NDU4Y2M0ZTlhOThmMDA4MmU3MDU...",
"access": "eyJhbGciOiJIUzUxMiIsInR5cCI6IkpXVCJ9.eyJ0b2tlbl90eXBlIjoiYWNjZXNzIiwiZXhwIjoxNzEyNTcxODkyLCJpYXQiOjE3MTI1NzA2OTIsImp0aSI6ImFiNjRmYjkyZmY1ZjQ0MTU4N2IwM2Y2MDJhMzhh..."
}In addition to the configurable parameters below, you can also add additional branding and customization to your widget when generating your access token. For more information, see our dedicated Branding and customization (OFDA) guide.
You can indicate how long any data should be stored in Belvo's database for the link (both single and recurrent). For example, if you send through 90d, Belvo will remove any data from its database relating to the user after 90 days (that is, 90 days after the last time the information was retrieved for the user). By default Belvo stores user data for 365 days, unless the link is deleted.
To use fetch_resources for single or recurrent links, you must have enabled a webhook URL in the dashboard.
For single and recurrent links, you can set which resources Belvo will asynchronously retrieve historical information for using the fetch_resources parameter. For more information, see our Asynchronous historical data workflow (single links) documentation.
| Resource | Institution Type |
|---|---|
ACCOUNTS | Banking Brazil |
OWNERS | Banking Brazil |
TRANSACTIONS | Banking Brazil |
BILLS | Banking Brazil |
INVESTMENTS | Banking Brazil |
INVESTMENT_TRANSACTIONS | Banking Brazil |
In the consent object, you can customize the messaging that is displayed to your user regarding what use case you are requesting their data for in the purpose field. By default, the widget displays the following message: _Soluções financeiras personalizadas oferecidas por meio de recomendações sob medida, visando melhores ofertas de produtos financeiros e de crédito. _.
To change the content, just add your text (maximum 600 characters) to the purpose field:
{
  "widget": {
    "consent": {
       "purpose": "Your custom text here. Max 600 characters",
       ...
    }
  }
}In the widget object, you need to add the callback_urls object with the following information:
successis the deeplink URL your user is redirected to when the flow is successful.exitis the deeplink URL your user is redirected to when they exit the widget before completing the flow.eventis the deeplink URL your user is redirected to when an error occurs.
In the consent object, you need to add a link to the terms and conditions of your company using the terms_and_conditions_url parameter.
In the consent object, we send through a default list of resources to retrieve for the user using the permissions parameter. The value of the permissions must always be the following array of items: ["REGISTER", "ACCOUNTS", "CREDIT_CARDS", "CREDIT_OPERATIONS"].
🚧 Changing Consent Permissions
If you need to change the default consent permissions, please make sure to reach out to our support team.
In the consent object, you need to provide the identification information of the user that you want to retrieve information for in the identification_info parameter. The information that you provide here must match the information that the regulated institution has for the user (for example, for businesses, the CPF and name must be for a user with access to the business account). For example:
{
  "consent": {
    "identification_info": [
      {
        "type": "CPF",
        "number": "76109277673",
        "name": "Ralph Bragg"
      }
    ]
  }
}
OK! Now that you can generate an access token, you can start the widget!
When you initiate your hosted widget, in the URL string you need to pass your:
- generated
accesstoken - set
localetopt
For example:
https://widget.belvo.io/?access_token={access_code}&locale=ptYou can also pass additional configuration parameters, such as what kind of link you want to create (access_mode), or what institutions to display based on the resources you can extract from them (resources), in the URL. For a full list of parameters (along with implementation details), please see our widget Startup Configuration (OFDA) article. For example:
https://widget.belvo.io/
	?access_token={access_code}
	&locale=pt
	&integration_type=openfinance
	&institution_types=retail
	&institutions=ofbradesco_br_retail
	&country_codes=BR
	&access_mode=recurrent
	&external_id=HJLSI-897809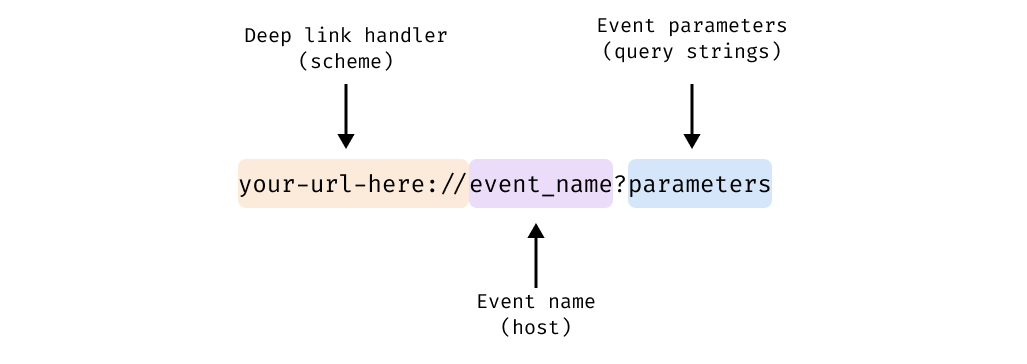
&resources=OWNERS,ACCOUNTSThe hosted widget makes use of deep link redirects to pass information about what happens in the widget. You'll need to be able to handle success, exit, and error events. The structure of the deep link is:
To aid your development, we've created guides on how to set up deep links and listen for events for the following platforms:
You'll receive a success event when your user has successfully connected their account to their institution using the widget. Being able to handle the success event is critical as it contains the link id of the user (required to later retrieve data from the Belvo API).

| Parameter | Description |
|---|---|
link | The link ID for the user. You'll need this ID to be able to make further requests for the user. |
institution | The institution that the link was created with. |
your-url-here://success
	?link=cb65f82c-dc93-4d3e-8270-9a27528397f5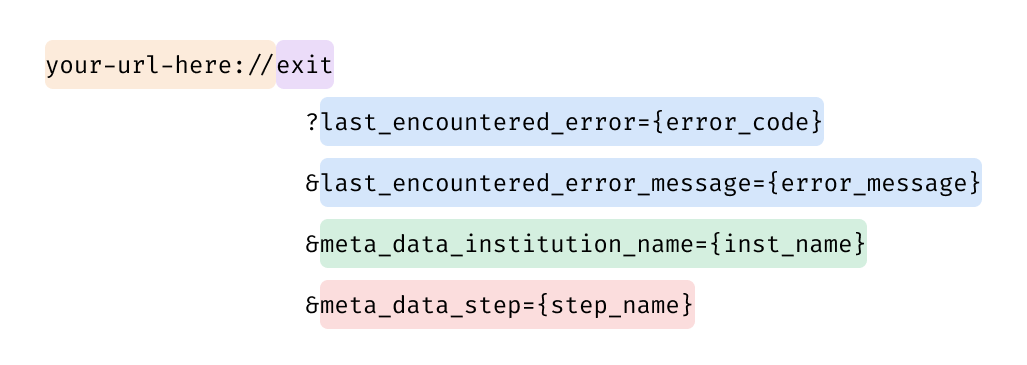
&institution=erebor_br_retailYou'll receive an exit event when your end user exits the widget:
- before connecting their account.
- after they have selected an institution.
- due to an error.
The last_encountered_error query string is only sent if an error occurred. See the table below for a full list of possible error codes and their messages.
| Error code | Error message |
|---|---|
institution_down | The financial institution is down, try again later |
login_error | The possible error messages for a login_error are: - Invalid credentials provided to login to the institution The user account is locked, user needs to contact the institution to unlock it The user account access was forbidden by the institution Impossible to login, something unexpected happened while logging into the institution. Try again later. |
too_many_sessions | Impossible to login, a session is already opened with the institution for these credentials |
unexpected_error | Belvo is unable to process the request due to an internal system issue or to an unsupported response from an institution |
The meta_data query string is sent whenever a user exits the widget. See the table below for a list of possible values.
| Parameter | Description |
|---|---|
step | Sent when the user exits the widget at the initial screen. The value of the parameter is always abandon-survey. |
institution_name | Sent when the user exits the widget after selecting an institution. The value will be Belvo's institution code, for example banamex_mx_retail. |
your-url-here://exit
	?last_encountered_error_code=login_error
	&last_encountered_error_message=Invalid%20credentials%20provided%20to%20login%20to%20the%20institution
	&meta_data_institution_name=amex_mx_retail
&meta_data_step=abandon-surveyYou'll receive an error event whenever an error occurs during the use of the widget.
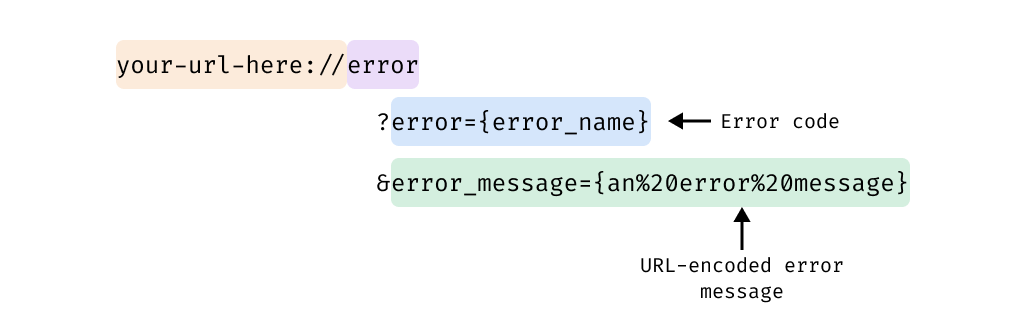
See the table below for a list of possible error codes and their messages.
| Error code | Error message |
|---|---|
ACCESS_TOKEN_NOT_VALID | The access token was not provided or is not valid |
your-url-here://error
	?error=ACCESS_TOKEN_NOT_VALID
&error_message=The%20access%20token%20was%20not%20provided%20or%20is%20not%20validYou'll receive a warning event whenever a non-terminating event occurs during the use of the widget.
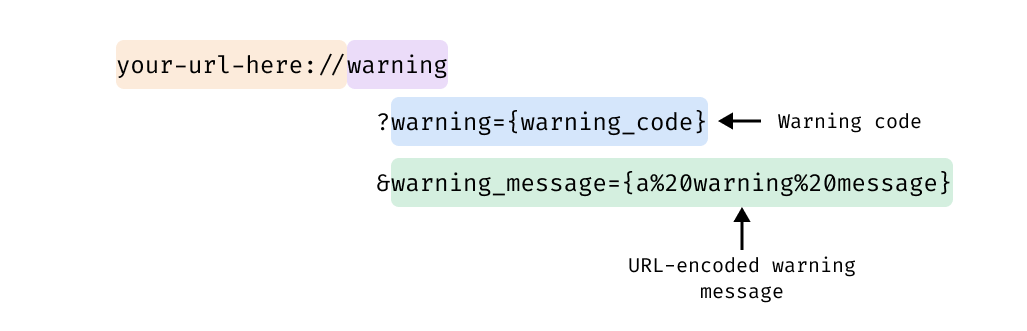
See the table below for a list of possible warning codes and their messages.
| Warning code | Warning message |
|---|---|
institution_disabled | The institution is temporarily unavailable. |
your-url-here://warning
	?warning=institution_disabled
	&warning_message=The%20institution%20is%20temporarily%20unavailable.
Now that you can handle deep links and retrieve the link id from the success event, you can start retrieving data about your user.
Once your user successfully connects their bank account, you'll receive the link_id in the success event. Belvo will then send you webhooks informing you when information is ready for the link. For more information, see: