Payment Links (Pix via Open Finance)
With Belvo's Open Finance Payment Initiation (OFPI), you can collect payments from your customers and optimize their payment experience. In this guide, we'll show you:
- the general flow of data
- how to create a Customer to request fund from
- how to create a Payment Lntent to send to your user
- track the status of your payment requests
Please make sure you have completed all the steps in our dedicated prerequisites article before continuing this guide.
Data flow overview
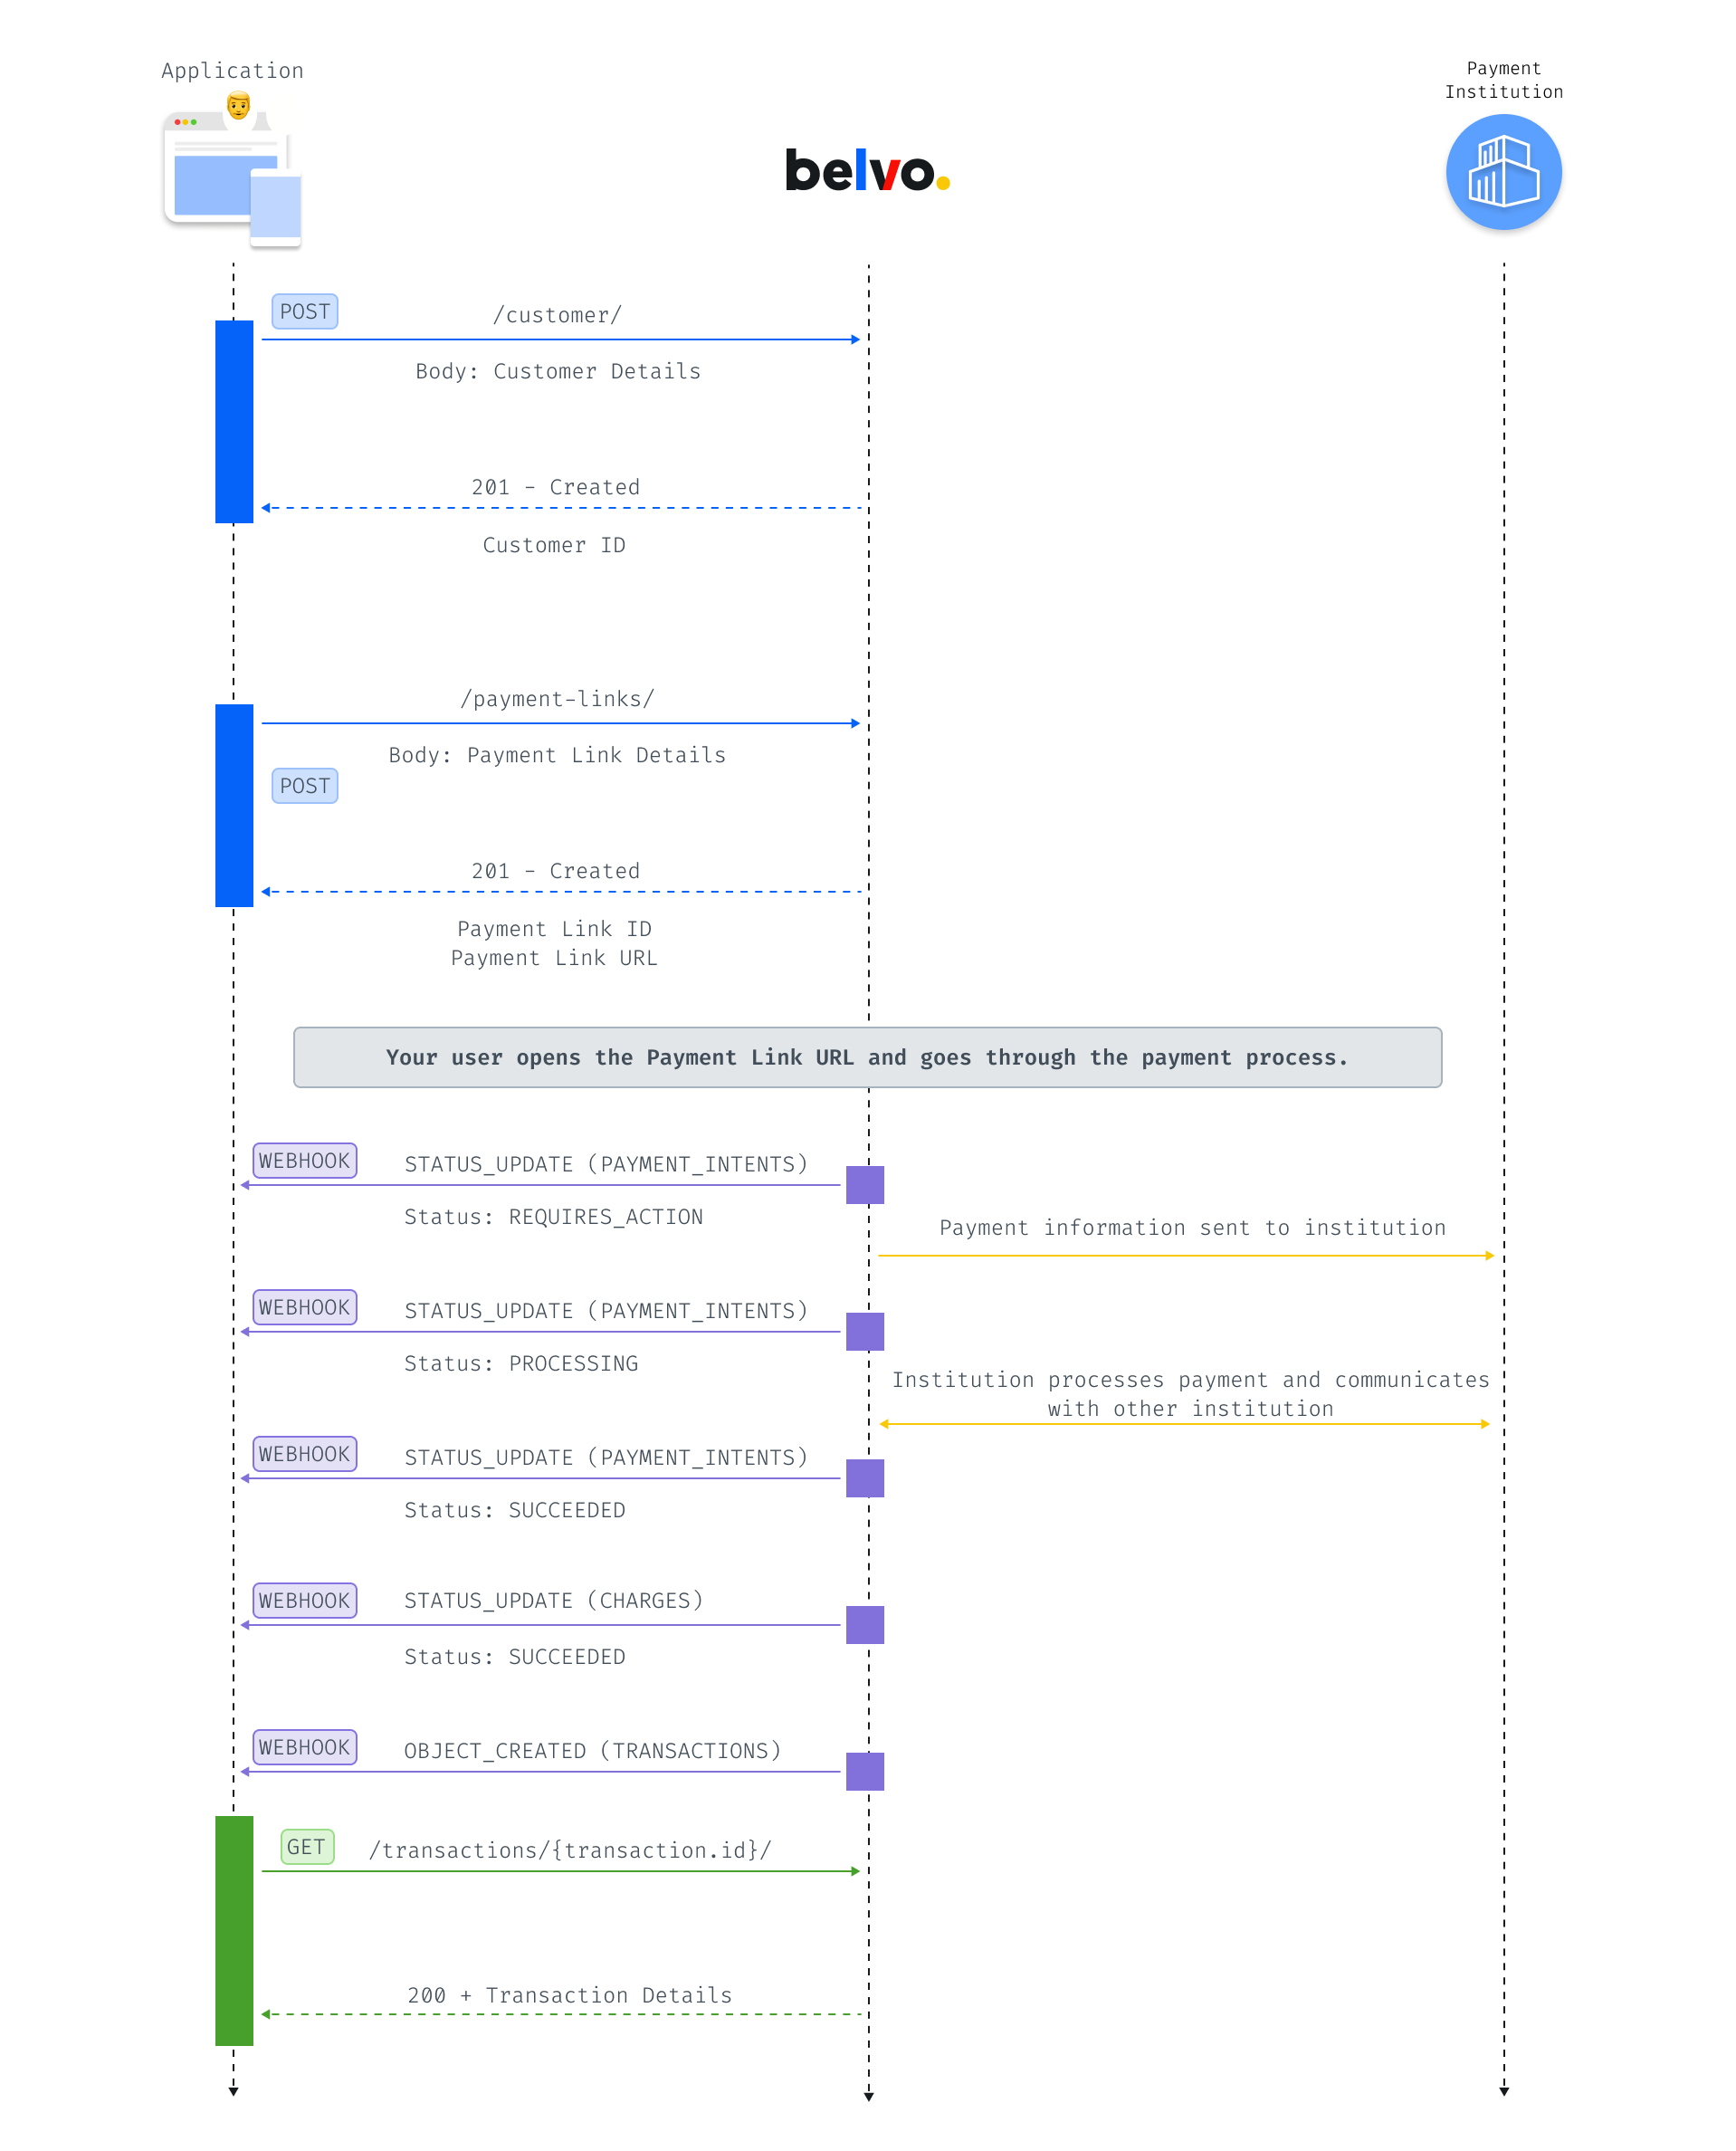
As you can see in the diagram below, the data flow for creating a payment using Pix via Open Finance involves:
- Creating a Customer for your user
- Creating a Payment Link (containing the base information for the payment to be processed in the Open Finance Network).
- Sending your user the Payment Link URL to process the payment.
- Listening for the
OBJECT_CREATEDwebhook from the transactions resource. - Getting the transaction details.
Create a Customer
For each user that you want to collect funds from, you need to create a Customer ([POST] Create a new customer). However, when requesting subsequent payments, you just need to use the id of the Customer you created.
{
  "identifier": "10187609363",
  "name": "Gustavo Veloso",
  "external_id": "2c75c041-9cc7-430a-84e9-3b234aae76a2",
  "email": "Gustavo.veloso@musicabrazil.br",
  "phone": "+5511987654321",
  "address": "Rua de Caetano Veloso 432, 70200 Brasilia"
}| Parameter | Required | Description |
|---|---|---|
identifier | true | The customer's CPF or CNPJ number. |
name | optional (but recommended) | The customer's full name address (high recommented). |
external_id | optional (but recommended) | An additional unique identifier (UUID) for the resource for internal purposes. This can be useful for tracking the resource in your system and for debugging purposes. |
email | optional | The customer's email address. |
phone | optional | The customer's phone number. |
address | optional | The customer's postal address. |
You'll receive the following response from our API, confirming that the customer was created. Make sure to save the id you receive, as this ID is required when creating a payment link 🤓.
{
  "id": "49f244ef-06cd-49cf-ad0c-f43796e370ad",
  "created_at": "2020-04-23T21:30:20.336854+00:00",
  "created_by": "1c83ead8-6665-429c-a17a-ddc76cb3a95e",
  "customer_type": "INDIVIDUAL",
  "name": "Caetano Veloso",
  "country": "BRA",
  "email": "caetano.veloso@musicabrazil.br",
  "identifier": "23******00",
  "identifier_type": "CPF",
}
Create a Payment Link
To create a Payment Link, you need to make a [POST] Create a payment link request.
{
  "amount": "1234.12",
  "description": "B23A-Shoe-Brown-Sneaker",
  "statement_description": "Super Shoe Store - Brown Sneakers",
  "customer": "06dc2f14-1217-4480-9b36-550a944a39d1",
  "allowed_payment_method_types": ["open_finance"],
  "payment_method_details": {
    "open_finance": {
      "beneficiary_bank_account": "a80d5a9d-20ae-479a-8dd7-ff3443bcbbfc",
    }
  },
  "callback_urls": {
    "cancel": "https://www.acmecorp.com/checkout/3487548/cancel",
    "success": "https://www.acmecorp.com/checkout/3487548/success"
  },
  "expires_in": "7d"
}| Parameter | Required | Description |
|---|---|---|
amount | true | The amount of the payment as a string. |
description | true | The description of the payment for your internal purposes. |
statement_description | optional (but recommented) | The description that will appear on the customer's bank statement (highly recommended). Note: If you do not use the statement_description parameter, the description value will be used as the statement description. |
customer | true | The id of the previously created customer that will make the payment. |
allowed_payment_method_types | true | The allowed_payment_method_types parameter indicates which payment method should be used. For payments in Brazil, this must be set to ["open_finance"]. |
payment_method_details.open_finance | true | In the open_finance object, you have to provide the following details about the payment: beneficiary_bank_account: The id of the bank account that will receive the payment funds. |
callback_urls | true | In the callback_urls object, you provide the URLs where you user should be redirected to: cancel: The URL that the user should be redirected to if they decide to cancel the payment process or if an error occurs. success: The URL that the user should be redirected to when they complete the payment process successfully. |
expires_in | true | In the expires_in parameter, you can provide the period that the payment link widget should be available for. Be default, it is set to 7 days (7d). You can provide the expires_in period in one of the following formats: whole number + m for x amount of minutes. For example: 15m for 15 minutes. whole number + h for x amount of hours. For example: 12h for 12 hours. whole number + d for x amount of days. For example: 7d for 7 days. |
Once you successfully create a Payment Link, you will need to send your user to the URL in the payment_url parameter. After confirming the payment, your user is redirected back to the callback_urls.success you provided in the Payment Link request.
Payment Link process
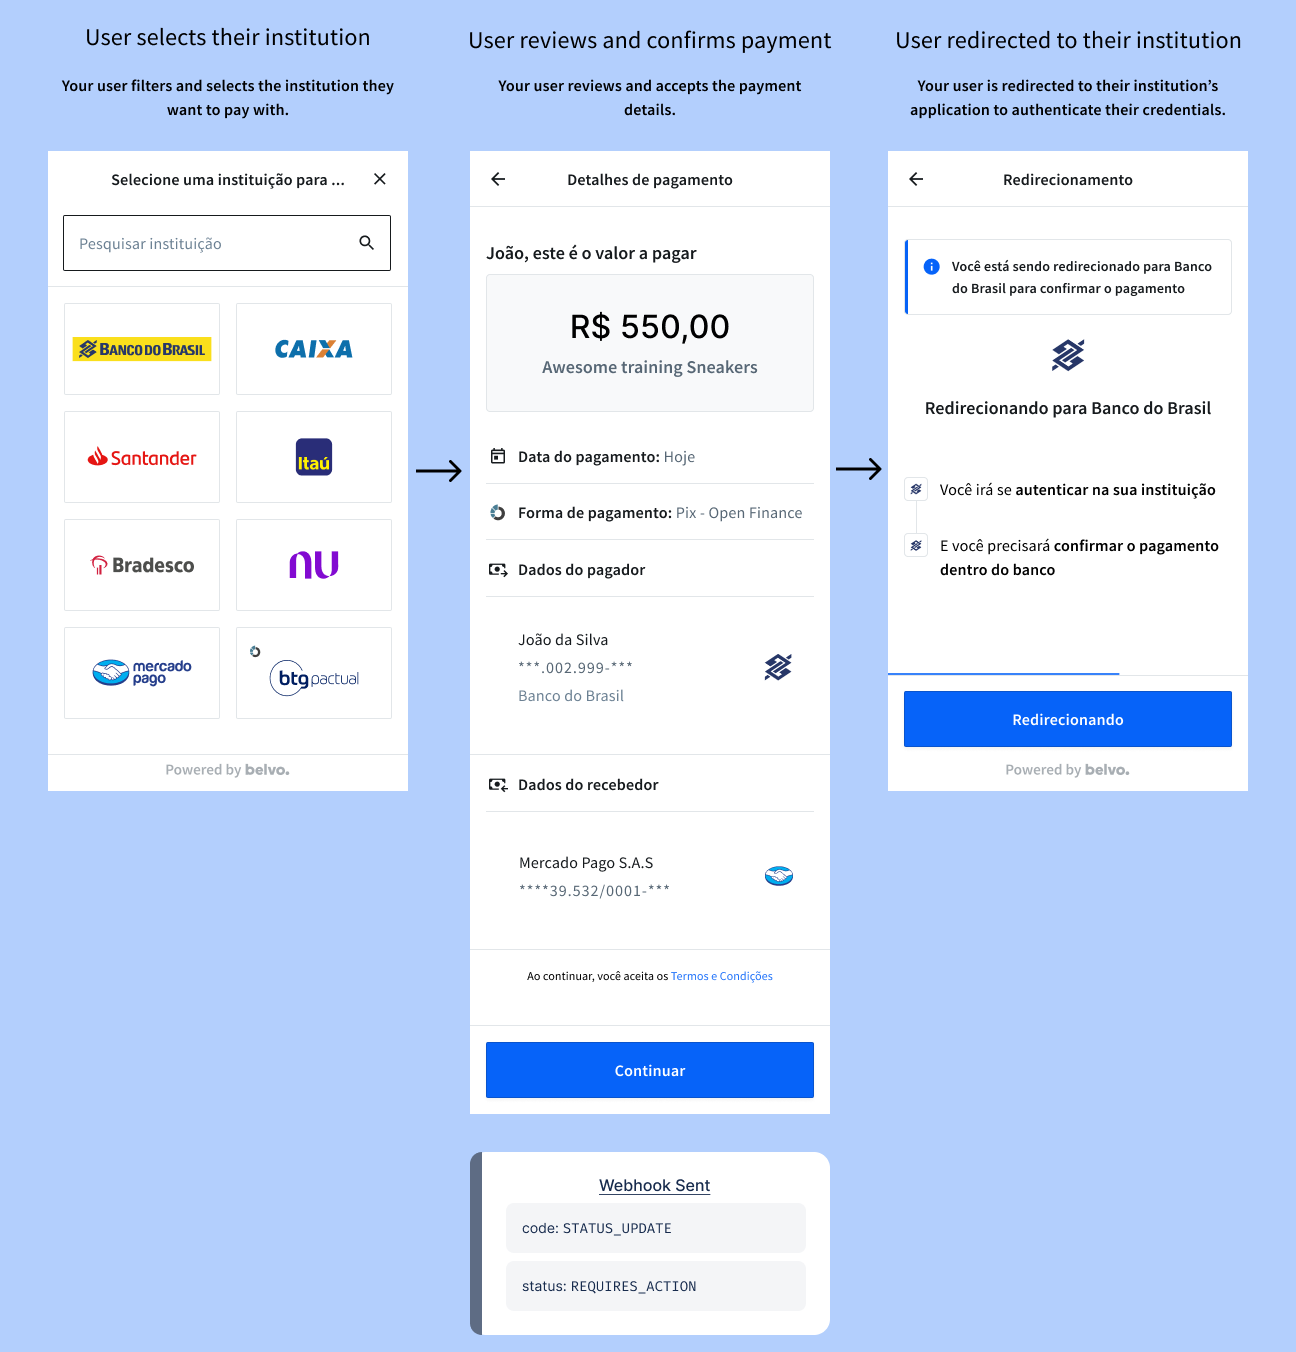
You need to share the payment_url with your user so they can start Belvo's Payment Link Widget. The widget will guide your user through the payment flow. When the Payment Link Widget starts up, your user will be:
- Asked to select their institution
- Asked to confirm the payment information
- Redirected to their institution to complete the payment process in their bank.
To help you keep track of your user's process within the Payment Link widget, Belvo sends payment intent status update webhook events. In the diagrams below we annotate which payment intent status event will be sent at which step of the process.
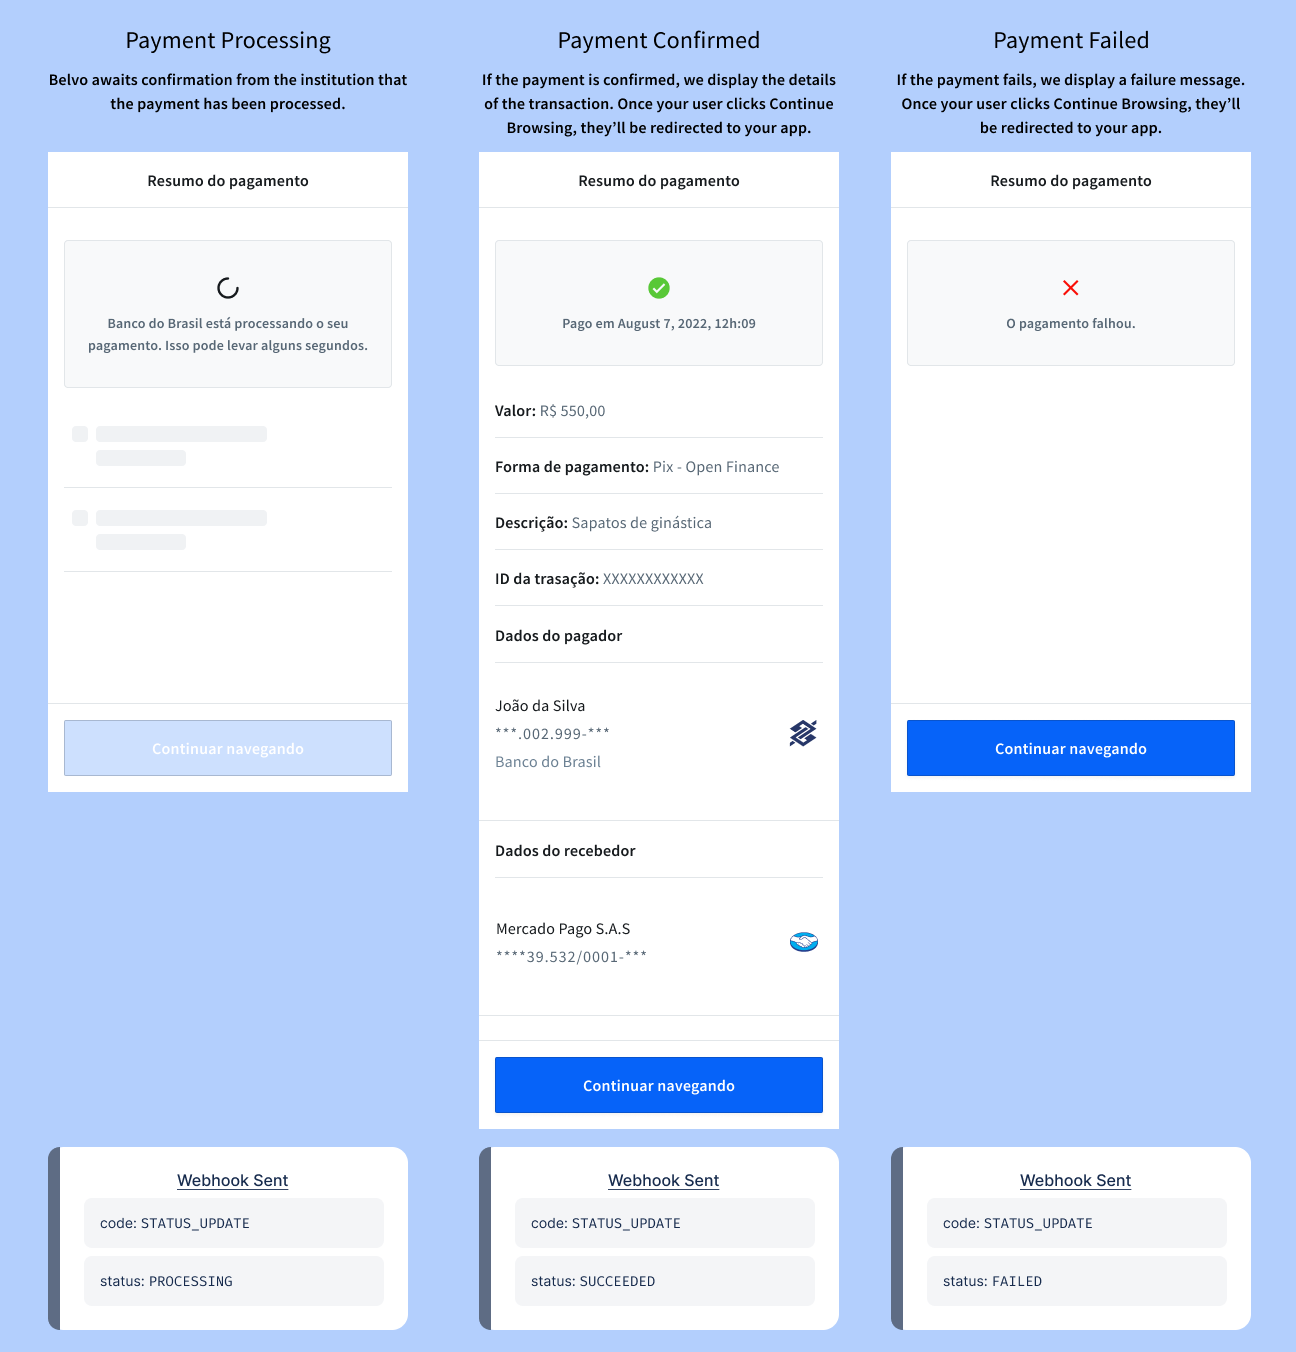
Once your user confirms the payment in their institution, they are be redirected back to the Payment Link Widget and will see a Processing state while Belvo confirms the payment. Depending on the outcome from their institution, your user will either see a Payment Confirmed or a Payment Failed screen in the widget.
At the moment, the widget will display a generic error message. But we're currently working on improving your experience and will be back soon with more in-depth explanations of all possible errors that can be displayed to the user. 😉
Listen for payment status updates
Once you create the Payment Link, Belvo will provide you updates regarding the payment via webhooks. As you can see in the image in the Data flow overview section, you will receive the following webhooks during the payment process:
| Event | Resource | Description |
|---|---|---|
STATUS_UPDATE | Payment Intents | The STATUS_UPDATE events for Payment Intents indicate the stage of the Pix via Open Finance payment process. You will receive the following status updates: REQUIRES_ACTION, PROCESSING, and SUCCEEDED. > Note: Apart from responding to the event with a 200 OK, no further action is required. |
STATUS_UPDATE | Charges | The STATUS_UPDATE events for Charges indicates the stage of the Pix via Open Finance payment process. You will receive the following status updates: SUCCEEDED. > Note: Apart from responding to the event with a 200 OK, no further action is required. |
OBJECT_CREATED | Transactions | The OBJECT_CREATED event for Transactions indicates that the payment funds were transferred from one account to another. > Note: Apart from responding to the event with a 200 OK, we recommend you also make a Get Transaction Details request to get the transaction information. |
Get details for successful transactions.
The OBJECT_CREATED webhook from the Transactions resource indicates that the payment succeeded and funds were transferred from one account to another. This means that every time money has been successfully transferred to your account, you will receive the following notification:
{
  "webhook_id": "3b9a69f7-0f0a-455b-832d-49ad6fd4905c",
  "webhook_type": "TRANSACTIONS",
  "webhook_code": "OBJECT_CREATED",
  "object_id": "d2e40773-19f6-48d1-93c3-3590ec0c74df",
  "data": {}, //For OBJECT_CREATED webhooks, the data field returns an empty object.
}
You can get the details about the transaction by making a GET details call using the object_id of the transaction (which you receive in the webhook event).
curl --request GET \
     --url https://api.belvo.com/payments/br/transactions/{id}/ \
--header 'accept: application/json'| Parameter | Type | Description | Example |
|---|---|---|---|
id | string (uuid) | The transaction.id that you want to get detailed information about. You can retrieve this ID from the object_id field that you received in the OBJECT_CREATED transactions webhook. | a3b92311-1888-449f-acaa-49ae28d68fcd |
You will receive the following information regarding the transaction:
{
  "id": "fd0f3303-cafb-47ea-9753-21155cb144ab",
  "created_at": "2020-04-23T21:30:20.336854+00:00",
  "created_by": "1c83ead8-6665-429c-a17a-ddc76cb3a95e",
  "amount": "500",
  "currency": "BRA",
  "description": "Awesome training Sneaker",
  "transaction_type": "INFLOW",
  "beneficiary": "a80d5a9d-20ae-479a-8dd7-ff3443bcbbfc",
  "payer": {},
  "payment_intent": "1c83ead8-6665-429c-a17a-ddc76cb3a95e",
  "customer": "3fa85f64-5717-4562-b3fc-2c963f66afa6"
}
And that's it! By following this guide you can make payments using Belvo's Pix via Open Finance product.