With Belvo's Pix Biometria, collecting payments from users becomes seamless, removing the need for users to navigate to their financial institution to approve each individual payment request. In this guide, we'll take you through each step, from device enrollment to successfully initiating a payment request.
Please make sure you have completed all the steps in our dedicated prerequisites article before continuing this guide.
Our Pix Biometria widget not only supports Dark Mode but also additional color customization. For more details, check our dedicated Branding and Customization (Pix Biometria Widget) article.

In the diagram below, you can see the overall enrollment and payment flow:
- Your user selects to pay with Pix Biometria.
- You generate an access token (with the required details for the enrollment and payment) and append it to the widget URL.
- You redirect your user to the widget URL.
- Your user goes through the enrollment and payment process within the widget.
- You will receive webhook events detailing the status of the enrollment, payment, and charge.
- Your user is redirected back to your application.
- You receive a transaction webhook confirming that the payment was processed.
And that's it! The entire enrollment and payment process only requires one POST call to the Belvo API! The rest is handled by the Pix Biometria Widget.
To make things easier on your workflow, we recommend that you always send through the enrollment and payment_intent objects. This will allow the widget to handle the entire flow for you (new enrollments, existing enrollments, and payments).
The access token is only valid for 30 minutes.
To generate an access token for the Pix Biometria widget that will do both the enrollment of the device and the payment, you will need to make a POST call to /api/payments/br/token with the following payload:
{
  "use_cases": ["ENROLLMENT", "PAYMENT_INTENT"],
  "widget": {
    "enrollment": {
      "type": "open_finance_biometric_pix",
      "external_id": "recommended_uuid",
      "details": {
        "name": "optional_name_for_enrollment",
        "customer": {
          "identifier": "user_CPF",
          "name": "Gustavo Veloso",
          "external_id": "recommended_uuid"
        }
      }
    },
    "payment_intent": {
      "amount": "amount_as_string",
      "external_id": "recommended_uuid",
      "description": "internal_description",
      "statement_description": "description_to_display",
      "allowed_payment_method_types": ["open_finance_biometric_pix"],
      "payment_method_details": {
        "open_finance_biometric_pix": {
          "beneficiary_bank_account": "registered_bank_account_belvo_id"
        }
      }
    },
    "callback_urls": {
      "success": "url_to_redirect_user_after_success",
      "exit": "url_to_redirect_user_after_exit_or_error"
    },
    "top_tier_institutions": [ "nubank_retail", "picpay_retail", "mercadopago_retail", "itau_retail"],
    "branding": {}, // See our dedicated branding and customization article
    "theme": [] // See our dedicated branding and customization article
  }
}{
"use_cases": ["ENROLLMENT", "PAYMENT_INTENT"],
"widget": {
}
}In the use_cases parameter, you need to provide the purpose of the widget. You can choose the following:
ENROLLMENT: Use this option if you want to enroll your user's device in the Pix Biometria network or to list your users previous enrollments.PAYMENT_INTENT: Use this option if you want to create a payment for your user using Pix Biometria.
If you pass both use cases (recommended), the widget will first enroll the user and then guide your user through the payment request as well.
The enrollment object contains key information that is required in order to enroll the user's device with their institution.
{
  "use_cases": ["ENROLLMENT", "PAYMENT_INTENT"],
  "widget": {
    "enrollment": {
      "type": "open_finance_biometric_pix",
      "external_id": "recommended_uuid",
      "details": {
        "name": "optional_name_for_enrollment",
        "customer": {
          "identifier": "user_CPF",
          "name": "Gustavo Veloso",
          "external_id": "recommended_uuid"
        }
      }
    },
  }
}| Parameter | Required | Description |
|---|---|---|
type | true | The type of enrollment. For 🇧🇷 Brazil's Pix Biometria payments, this must be set to open_finance_biometric_pix. |
external_id | highly recommended | An additional unique identifier for the resource for internal purposes. We recommend using this field to store your own unique identifier for each resource (customer, bank account, payment intent, or enrollment). This can be useful for tracking the resource in your system and for debugging purposes. |
details.name | optional | Use the name parameter to provide an optional, human-readable, name for the enrollment. |
details.customer | true | In the customer object, you need to provide:
|
The payment_intent object contains all the information required to make the payment.
{
  "use_cases": ["ENROLLMENT", "PAYMENT_INTENT"],
  "widget": {
    "enrollment": {
      "type": "open_finance_biometric_pix",
      "external_id": "recommended_uuid",
      "details": {
        "name": "optional_name_for_enrollment",
        "customer": {
          "identifier": "user_CPF",
          "name": "Gustavo Veloso",
          "external_id": "recommended_uuid"
        }
      }
    },
    "payment_intent": {
      "amount": "amount_as_string",
      "external_id": "recommended_uuid",
      "description": "internal_description",
      "statement_description": "description_to_display",
      "allowed_payment_method_types": ["open_finance_biometric_pix"],
      "payment_method_details": {
        "open_finance_biometric_pix": {
          "beneficiary_bank_account": "registered_bank_account_belvo_id"
        }
      }
    },
  }
}| Parameter | Required | Description |
|---|---|---|
amount | true | In the amount parameter, you need to provide the amount of the payment as a string. |
external_id | highly recommended | An additional unique identifier for the resource for internal purposes. We recommend using this field to store your own unique identifier for each resource (customer, bank account, payment intent, or enrollment). This can be useful for tracking the resource in your system and for debugging purposes. |
description | true | In the description parameter, you need to provide a description of the payment for your internal purposes. |
statement_description | highly recommended | In the optional statement_description parameter, you need to provide a description that will appear on the customer's bank statement (highly recommended). If you do not use the statement_description parameter, the description value will be used as the statement description. |
allowed_payment_method_types | true | The allowed_payment_method_types parameter indicates which payment method should be used. For Pix Biometria payments in Brazil, this must be set to ["open_finance_biometric_pix"]. |
payment_method_details | true | In the payment_method_details object, you provide additional information required to process a payment in the Open Finance network. Specifically, you will provide the beneficiary_bank_account in the open_finance_biometric_pix object.
|
In the callback_urls object (required), you must add links to where your user should be redirected to. In the case of an error during the enrollment or payment, the user will be redirected to the exit URL. If the enrollment or payment is successful, the user will be redirected to the success URL.
{
  "use_cases": ["ENROLLMENT", "PAYMENT_INTENT"],
  "widget": {
    "enrollment": {
      "type": "open_finance_biometric_pix",
      "external_id": "recommended_uuid",
      "details": {
        "name": "optional_name_for_enrollment",
        "customer": {
          "identifier": "user_CPF",
          "name": "Gustavo Veloso",
          "external_id": "recommended_uuid"
        }
      }
    },
    "payment_intent": {
      "amount": "amount_as_string",
      "external_id": "recommended_uuid",
      "description": "internal_description",
      "statement_description": "description_to_display",
      "allowed_payment_method_types": ["open_finance_biometric_pix"],
      "payment_method_details": {
        "open_finance_biometric_pix": {
          "beneficiary_bank_account": "registered_bank_account_belvo_id"
        }
      }
    },
    "callback_urls": {
      "success": "url_to_redirect_user_after_success",
      "exit": "url_to_redirect_user_after_exit_or_error"
    },
    "top_tier_institutions": [ "nubank_retail", "picpay_retail", "mercadopago_retail", "itau_retail"],
    "branding": {
      "color_scheme": "LIGHT",
      "company_name": "ACME"
    },
    "theme": [] // See our dedicated branding and customization article
  }
}| Parameter | Required | Description |
|---|---|---|
success | true | The URL your user is redirected to when they successfully complete the enrollment or payment. |
| true | The URL your user is redirected to when they exit the widget process or encounter an error. The User-initiated exits:
Error conditions:
When redirected to the exit URL due to an error, query parameters will be attached to provide error details. Below is an example of a Example Error Callback Structure https://<exit_url>/?error=token_not_valid&error_description=Authorization+header+is+missing+or+invalid. |
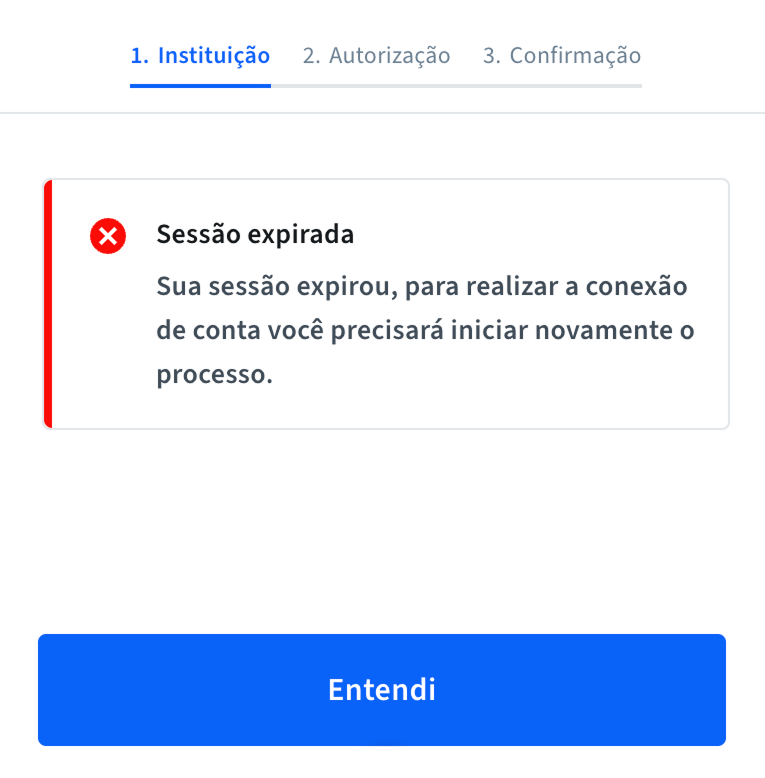
In the case of a token not valid error, your user will see the following message in the widget (in Portuguese): "Sessão expirada: Sua sessão expirou, para realizar a conexão de conta você precisará iniciar novamente o processo."
{
  "use_cases": ["ENROLLMENT", "PAYMENT_INTENT"],
  "widget": {
    // Other parameters...
    "top_tier_institutions": [ "nubank_retail", "picpay_retail", "mercadopago_retail", "itau_retail"]
  }
}
In the top_tier_institutions parameter, you can provide a list of institutions that will be initially displayed in the widget (users will still be able to search for other institutions). You can select between 1 to 5 institutions from the available list. The institutions will display in the order you provide them in the array. If you do not pass this parameter, the widget will display all available institutions.
For a list of available institutions, please see the top_tier_institutions parameter in our API Reference.
{
  "use_cases": ["ENROLLMENT", "PAYMENT_INTENT"],
  "widget": {
    "enrollment": {
      "type": "open_finance_biometric_pix",
      "external_id": "recommended_uuid",
      "details": {
        "name": "optional_name_for_enrollment",
        "customer": {
          "identifier": "user_CPF",
          "name": "Gustavo Veloso",
          "external_id": "recommended_uuid"
        }
      }
    },
    "payment_intent": {
      "amount": "amount_as_string",
      "external_id": "recommended_uuid",
      "description": "internal_description",
      "statement_description": "description_to_display",
      "allowed_payment_method_types": ["open_finance_biometric_pix"],
      "payment_method_details": {
        "open_finance_biometric_pix": {
          "beneficiary_bank_account": "registered_bank_account_belvo_id"
        }
      }
    },
    "callback_urls": {
      "success": "url_to_redirect_user_after_success",
      "exit": "url_to_redirect_user_after_exit_or_error"
    },
    "top_tier_institutions": [ "nubank_retail", "picpay_retail", "mercadopago_retail", "itau_retail"],
    "branding": {
      "color_scheme": "LIGHT",
      "company_name": "ACME"
    }, // See our dedicated branding and customization article
    "theme": [] // See our dedicated branding and customization article
  }
}In the branding object, can add additional customization to the widget to match your brand or application needs.
| Parameter | Required | Description |
|---|---|---|
color_scheme | true | In the color_scheme parameter you define whether the widget should be in LIGHT (default) or DARK mode. If you want to further customize the colors for these modes, please see the theme parameter. |
company_name | true | The name of your company. |
You can optionally add your brand colors to the widget using the theme parameter. For more information regarding where these colors will appear in the widget, check out the dedicated Pix Biometria branding guide.
Our API will return with the following payload:
{
    "refresh": "eyJhbGciOiJIUzUxMiIsInR5cCI6IkpXVCJ9.eyJ0b2tlbl90eXBlIjoicmVmcmVzaCIsImV4cCI6MjMzNDY1MDY5MiwiaWF0IjoxNzEyNTcwNjkyLCJqdGkiOiIxMDAxMTg4NDU4Y2M0ZTlhOThmMDA4MmU3MDU3YzBmNyIsInVzZXJfaWQiOiI2ZTliZTg4NC00NzgxLTQxNDMtYjY3My1hY2EwMjQ3NWVlOGMiLCJvcmdhbml6YXRpb25fbmFtZSI6IkRvbWluaWsgQ2hvbGV3c2tpJ3MgdGVhbSIsIm9yZ2FuaXphdGlvbl9pZCI6IjZlOWJlODg0LTQ3ODEtNDE0My1iNjczLWFjYTAyNDc1ZWU4YyIsInNjb3BlcyI6WyJyZWFkX2luc3RpdHV0aW9ucyIsIndyaXRlX2xpbmtzIl0sImVudmlyb25tZW50Ijoic2FuZGJveCIsImFwaV91cmwiOiJzYW5kYm94LmJlbHZvLmNvbSIsImNyZWRlbnRpYWxzX3N0b3JhZ2UiOiIzMGQiLCJzdGFsZV9pbiI6IjM2NWQiLCJmZXRjaF9yZXNvdXJjZXMiOlsiQUNDT1VOVFMiLCJUUkFOU0FDVElPTlMiLCJPV05FUlMiXSwiaXNzIjoic2FuZGJveC5iZWx2by5jb20ifQ.X43VAc6c37U0JbiYgSd_r4SESjvGOuMgOpK5_DbuMHF7seATr7atO1QiUGwxdwBlEHo9ECST_9QKiHjv7G2czg",
    "access": "eyJhbGciOiJIUzUxMiIsInR5cCI6IkpXVCJ9.eyJ0b2tlbl90eXBlIjoiYWNjZXNzIiwiZXhwIjoxNzEyNTcxODkyLCJpYXQiOjE3MTI1NzA2OTIsImp0aSI6ImFiNjRmYjkyZmY1ZjQ0MTU4N2IwM2Y2MDJhMzhhMjNhIiwidXNlcl9pZCI6IjZlOWJlODg0LTQ3ODEtNDE0My1iNjczLWFjYTAyNDc1ZWU4YyIsIm9yZ2FuaXphdGlvbl9uYW1lIjoiRG9taW5payBDaG9sZXdza2kncyB0ZWFtIiwib3JnYW5pemF0aW9uX2lkIjoiNmU5YmU4ODQtNDc4MS00MTQzLWI2NzMtYWNhMDI0NzVlZThjIiwic2NvcGVzIjpbInJlYWRfaW5zdGl0dXRpb25zIiwid3JpdGVfbGlua3MiXSwiZW52aXJvbm1lbnQiOiJzYW5kYm94IiwiYXBpX3VybCI6InNhbmRib3guYmVsdm8uY29tIiwiY3JlZGVudGlhbHNfc3RvcmFnZSI6IjMwZCIsInN0YWxlX2luIjoiMzY1ZCIsImZldGNoX3Jlc291cmNlcyI6WyJBQ0NPVU5UUyIsIlRSQU5TQUNUSU9OUyIsIk9XTkVSUyJdLCJpc3MiOiJzYW5kYm94LmJlbHZvLmNvbSJ9.2Irt1KCEKo6V17Y-N3zWeX3AchEvCrUWa_AlWoZ2gIIBhHvghHGkXtupOOrXKVqW9kTCOBE77-1riyyblUo4fw"
}Once you receive the access token, you just need to append the value of the access parameter to the following URL:
https://pix-biometria.pay.belvo.com/?access_token={access_token}

## Example
https://pix-biometria.pay.belvo.com/?access_token=eyJhbGciOiJIUzUxMiIsInR5cCI6IkpXVCJ9.eyJ0b2tlbl90eXBlIjoicmVmcmVzaCIsImV4cCI6MjMzNDY1MDY5MiwiaWF0IjoxNzEyNTcwNjkyLCJqdGkiOiIxMDAxMTg4NDU4Y2M0ZTlhOThmMDA4MmU3MDU3YzBmNyIsInVzZXJfaWQiOiI2ZTliZTg4NC00NzgxLTQxNDMtYjY3My1hY2EwMjQ3NWVlOGMiLCJvcmdhbml6YXRpb25fbmFtZSI6IkRvbWluaWsgQ2hvbGV3c2tpJ3MgdGVhbSIsIm9yZ2FuaXphdGlvbl9pZCI6IjZlOWJlODg0LTQ3ODEtNDE0My1iNjczLWFjYTAyNDc1ZWU4YyIsInNjb3BlcyI6WyJyZWFkX2luc3RpdHV0aW9ucyIsIndyaXRlX2xpbmtzIl0sImVudmlyb25tZW50Ijoic2FuZGJveCIsImFwaV91cmwiOiJzYW5kYm94LmJlbHZvLmNvbSIsImNyZWRlbnRpYWxzX3N0b3JhZ2UiOiIzMGQiLCJzdGFsZV9pbiI6IjM2NWQiLCJmZXRjaF9yZXNvdXJjZXMiOlsiQUNDT1VOVFMiLCJUUkFOU0FDVElPTlMiLCJPV05FUlMiXSwiaXNzIjoic2FuZGJveC5iZWx2by5jb20ifQ.X43VAc6c37U0JbiYgSd_r4SESjvGOuMgOpK5_DbuMHF7seATr7atO1QiUGwxdwBlEHo9ECST_9QKiHjv7G2czg
In your application, redirect your user to the URL you formed in the previous step. This will load the widget and your user will be guided through the enrollment and payment process.
Below you can see the process your user will go through in the widget to complete the enrollment process.
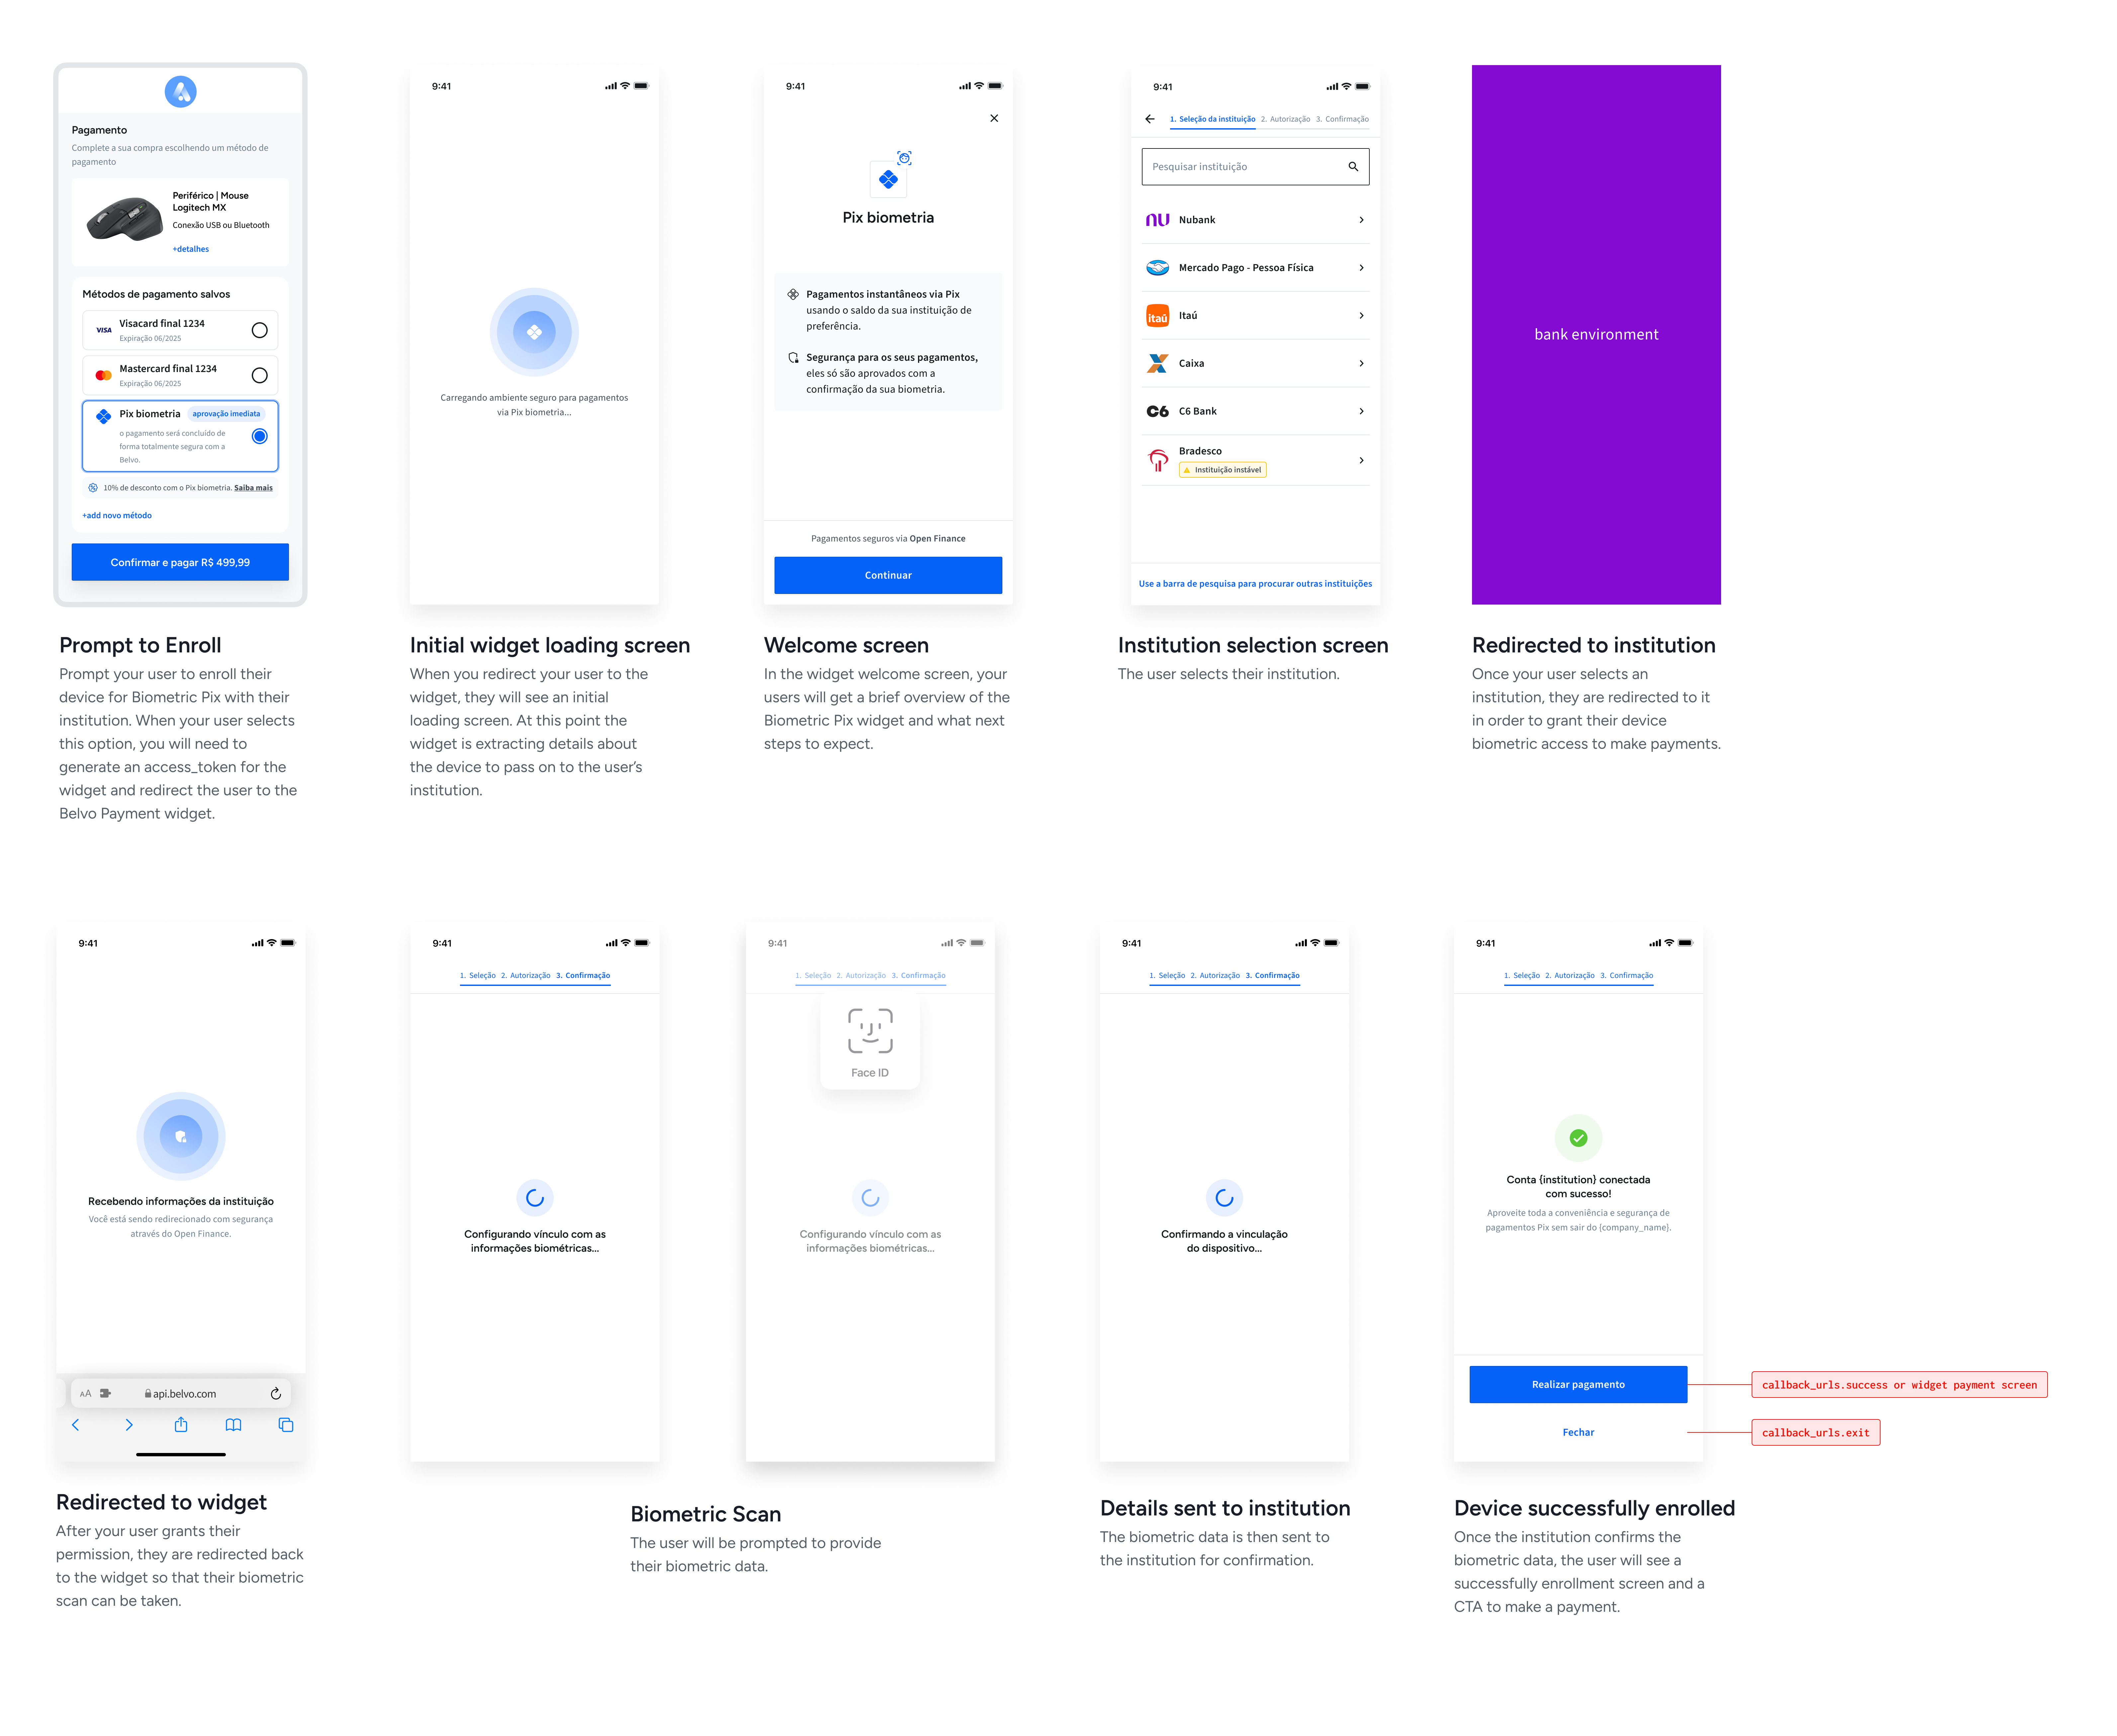
During the enrollment flow, you will receive the following webhook notifications:
| Webhook Code | Type (Resource) | Description | Trigger |
|---|---|---|---|
OBJECT_CREATED | CUSTOMERS | In the case that the CPF you sent through for your user has not been registered yet for your account in our system, we will create the customer and notify via webhook and provide you with the customer.id. We recommend you store this ID with the associated user in your database. | User has selected their institution and is redirected to it. |
OBJECT_CREATED | ENROLLMENTS | Once we begin the enrollment process and create it in our system, we notify you via webhook and provide with the enrollment.id. We recommend you store this ID with the associated user in your database. Note 1: To associate the enrollment with your user, please check the details.metadata.{provided_key} for the unique identifier you provided for the widget session. Note 2: A user can have multiple enrollments (for each institution and for each device). In other words, there is a 1:N relationship between the customer and number of enrollments associated with the customer. | User has selected their institution and is redirected to it. |
STATUS_UPDATE | ENROLLMENTS | When the user is redirected from their institution back to the widget, you will receive a STATUS_UPDATE notification, indicating whether the enrollment process was successful or not. You can receive one of the following webhook events: SUCCEEDED FAILEDFor more details, see our dedicated Enrollments Webhooks section. | User is redirected back to the widget. |
Below you can see the process your user will go through in the widget to complete the enrollment process.
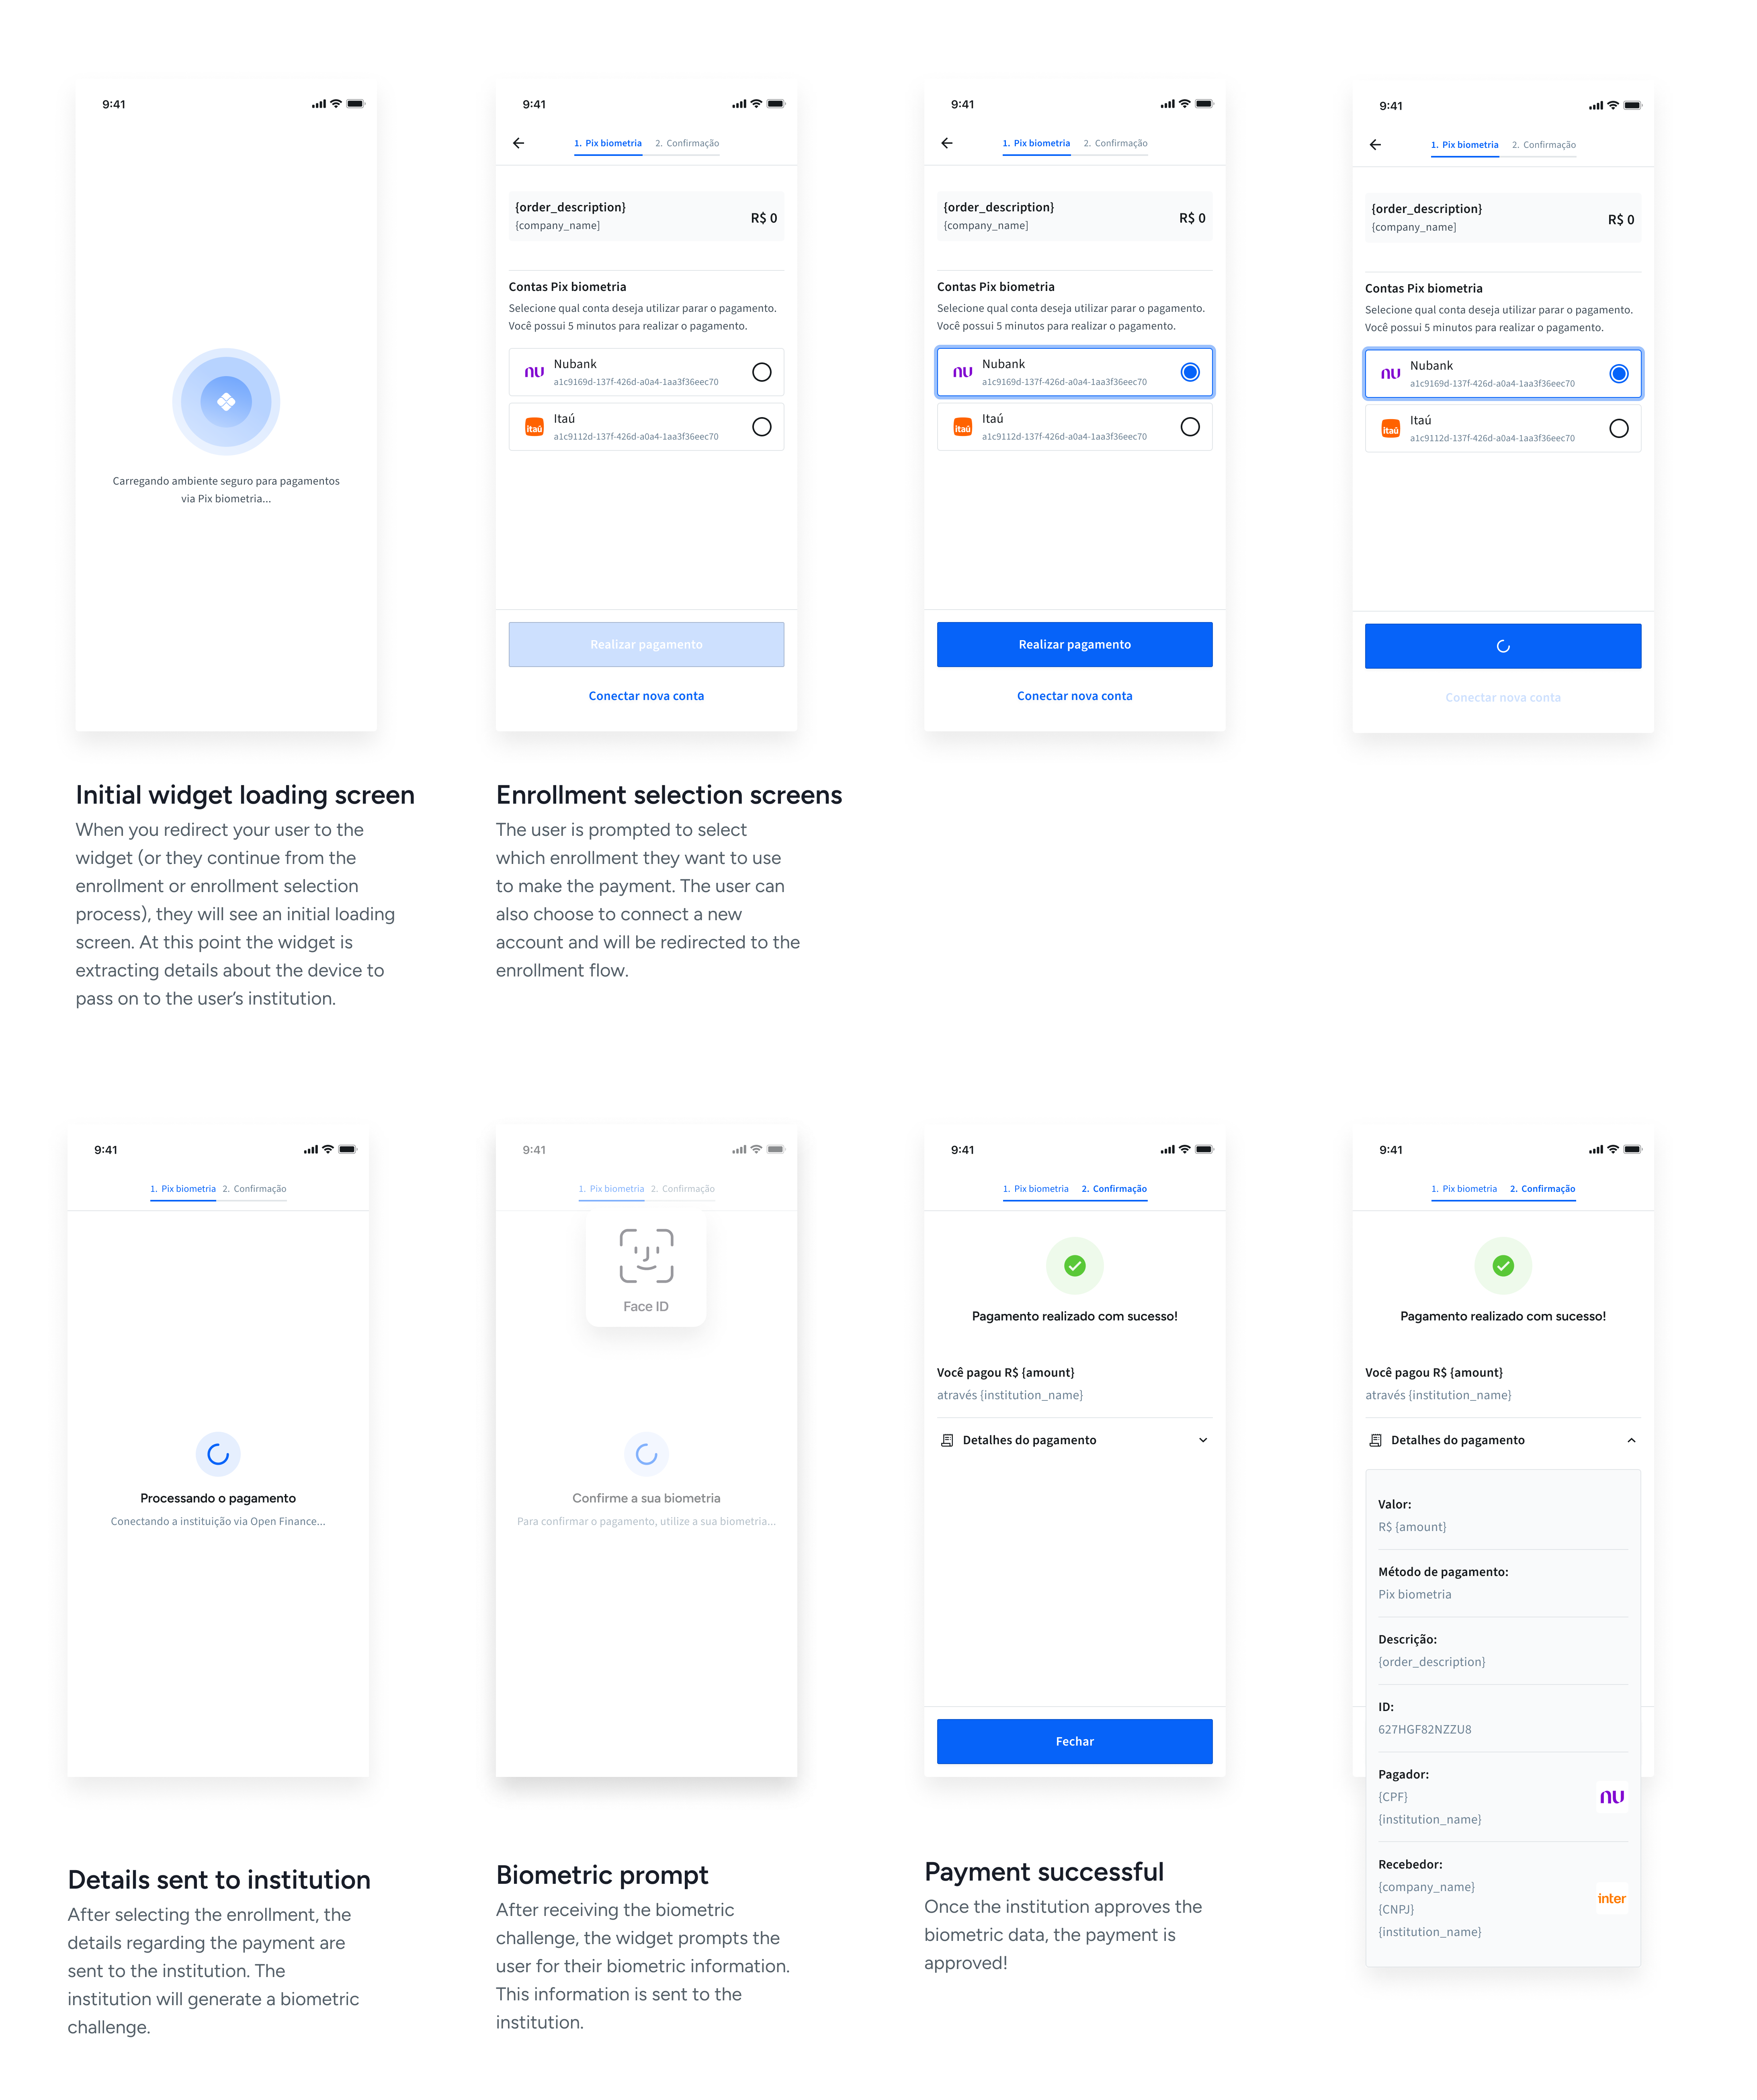
During the payment flow, you will receive the following webhook notifications:
| Webhook Code | Type (Resource) | Description | Trigger |
|---|---|---|---|
OBJECT_CREATED | PAYMENT_INTENTS | Once we begin the payment process and create it in our system, we notify you via webhook and provide with the payment_intent.id. Note: To associate the payment intent with your user (or enrollment), please check the details.metadata.{provided_key} for the unique identifier you provided for the widget session. | User has selected which enrollment to use and clicked continue. |
OBJECT_CREATED | CHARGES | Once we begin the payment process and create it in our system, we notify you via webhook and provide with the charge.id. | User has selected which enrollment to use and clicked continue. |
STATUS_UPDATE | PAYMENT_INTENTS | During the widget and payment process you will receive the following STATUS_UPDATE webhooks for the payment intent: REQUIRES_ACTION PROCESSING SUCCEEDED FAILED | You will receive the REQUIRES_ACTION and PROCESSING events at the same time as OBJECT_CREATED. The latter two you receive when the payment is completed successfully or fails. |
STATUS_UPDATE | CHARGES | During the widget and payment process you will receive the following STATUS_UPDATE webhooks for the charge: SUCCEEDED FAILED | When the payment is completed successfully or fails. |
OBJECT_CREATED | TRANSACTIONS | Once the payment intent and associated charge has been succesfully processed, Belvo will create a Transaction. | The transaction was successfully processed by the institution. |
To make subsequent payments for the user, you can actually use the same access_token payload as in Step 1 - Generate an access_token. Our widget will automatically detect if your user has any existing enrollments and if so, immediately start the widget in the Widget Payment Flow.