Webhooks (Aggregation)
Use webhooks to create a proactive experience for your users 💪.
A webhook is a web callback that Belvo uses to send notifications about a specific link.
Institution status webhook
In addition to Belvo's own webhooks, you can also subscribe to our statuspage.io Institution status webhook to receive up to date information regarding any outages an institution is experiencing. For more information, see our dedicated Institution status (external webhook) guide.

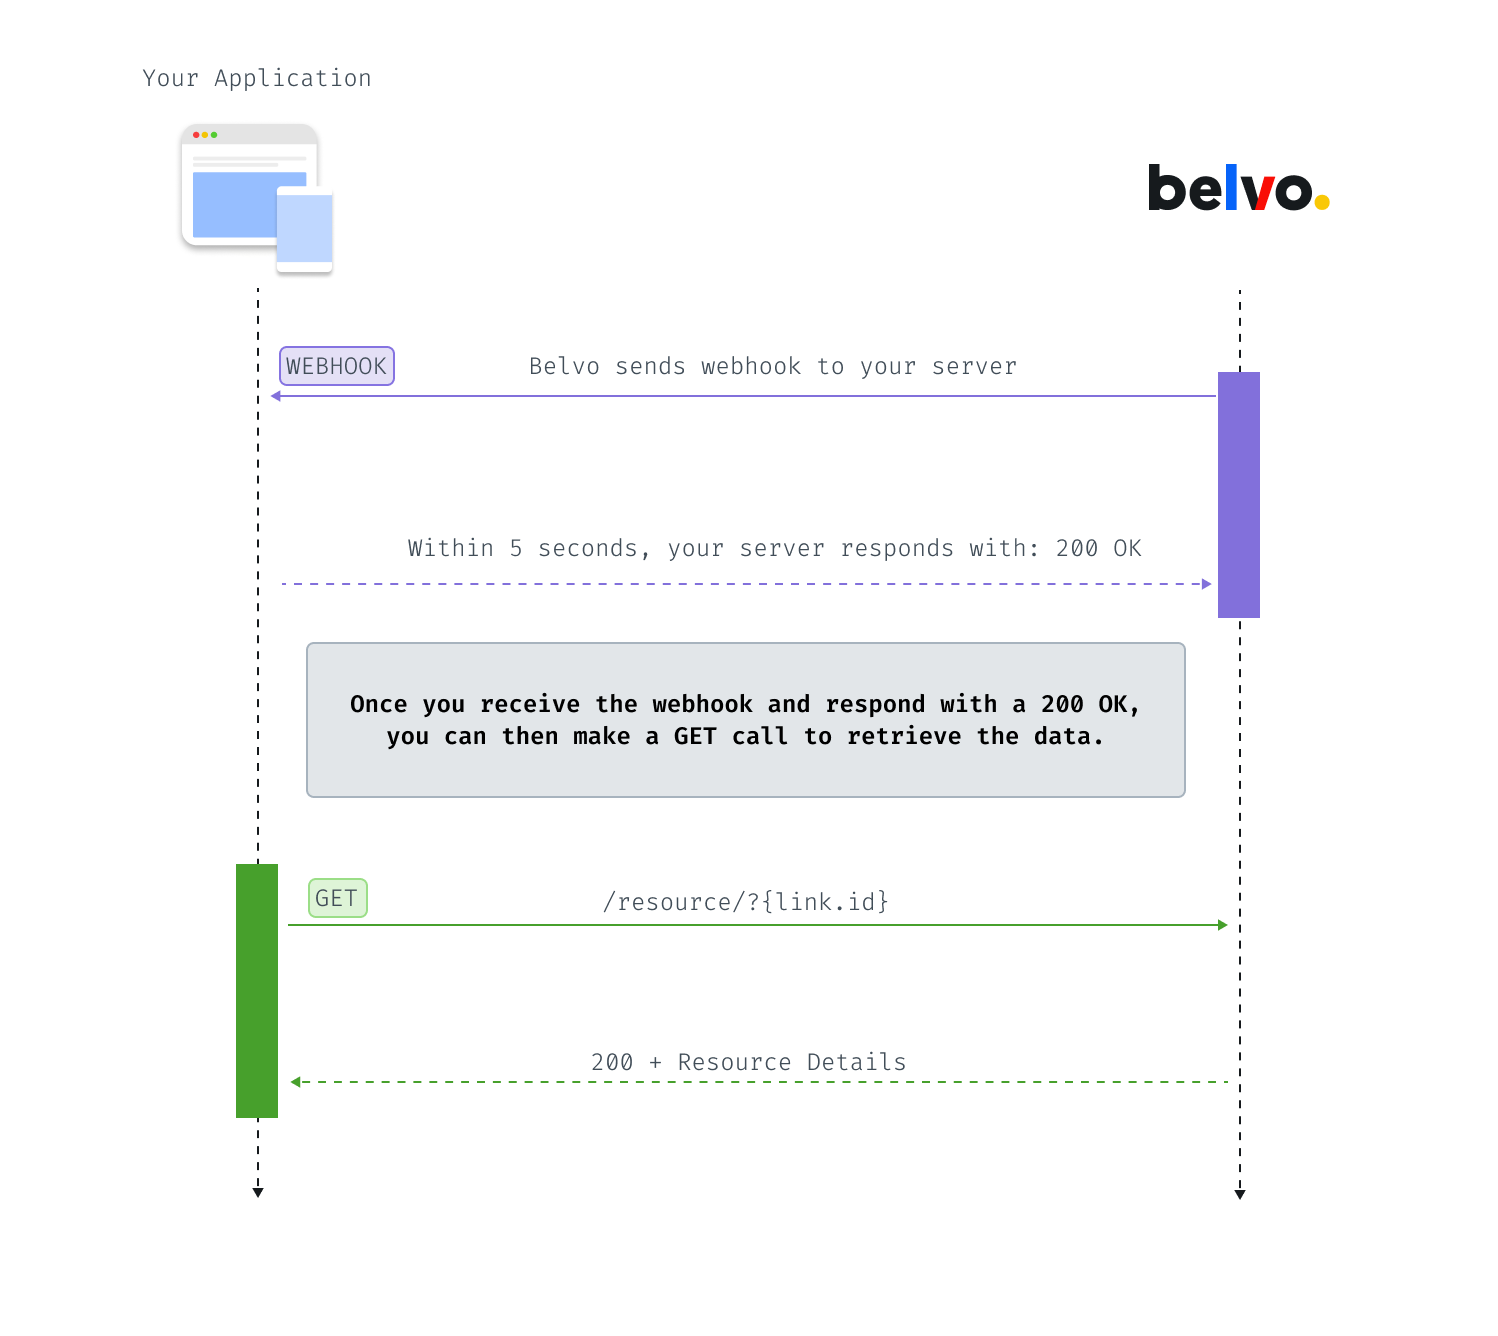
Webhook data flow
How do webhooks work?
Single Links
With single links, when you use our historical data workflow, Belvo will automatically retrieve the historical data for the resources you choose and notify you via webhook (historical_update) when the data is ready for you to retrieve.
Recurrent Links
Belvo automatically refreshes recurrent links on a weekly basis to retrieve fresh content. Once we refresh a link, we notify your application of any interesting events that occur. This can include information such as new transactions, changed link credentials, and so on.
Recurrent links and frequency
If you have set up your recurrent links to be refreshed every 6 hours, 12 hours, 24 hours, 7 days, or 30 days, you can receive webhook events with the same frequency.
- Note: The
transactions_updatedandtransactions_deletedwebhooks work for both single and recurrent links.
To start receiving webhook events, you need to set up a webhook URL.
Set up webhooks
To set up a new webhook:
- From the Environment Switcher in your Belvo dashboard, select the environment you want to create a new webhook in.
- Select the Webhooks tab and click +New webhook.
- Fill in the New webhook form with the required information.
- URL: the URL to receive the webhook notifications.
- Authorization: an optional bearer token to use if your URL is protected.
- Click Create webhook.
✳️ Done! The webhook is now set up and your application will be notified of new events related to your links.
Using additional authentication
For security reasons, you can add an additional layer of authentication to your webhook calls. When you create your webhook, in the Authentication (Optional) field, enter either:
Basicand a base64-encodedusername:passwordstring (for Basic authentication)Bearerand a token (for Bearer authentication)
Webhook events
All webhook events come with a core payload (as described in the code example).
{
  "webhook_id": "aadf41a1fc8e4f79a49f7f04027ac999", // Belvo webhook ID
  "webhook_type": "ACCOUNTS", // From what endpoint the webhook is from
  "process_type": "historical_update", // Indicates why the webhook was triggered
  "webhook_code": "historical_update", // Webhook type
  "link_id": "16f68516-bcbc-4cf7-b815-c500d4204e28", // Link
  "request_id": "4363b08b-51eb-4350-9c74-5df5ac92a7f6",
  "external_id": "your_external_id", // Your external ID for the link, if you provided one.
  "data": {
    // Contents of the webhook. For more information, please see the relative Webhook type documentation.

  }
}
Webhook
process_typeThe
process_typeparameter indicates why the webhook event was triggered. We return one of the following values:
historical_update: The webhook was triggered as we finished a historical update for the data retrieval (for recurrent links and for single links with fetch_resources).recurrent_update: The webhook was triggered due to the recurrent (cyclical) refresh of the data.async_post: The webhook was triggered as the asynchronous retrieval of data from a POST call is complete.
For information about the data specific for a given webhook, please look at the dedicated page for each resource.
Webhooks in the Sandbox environment
At the moment our Sandbox environment does not support LINK webhook event types.
For all other webhook types, you will always get a historical event when you create a link in an institution. However, to get "new" events, you need to go to your Belvo Dashboard and manually trigger an event to occur.
Webhook error events
Sometimes while retrieving information from an institution, an error can occur. In this case, the webhook event’s data object will contain the error information that occurred. For example:
{
    "webhook_id": "5b82fdf536da43039c69a4305ecb1ceb",
    "webhook_type": "ACCOUNTS",
    "webhook_code": "historical_update",
    "link_id": "c7ba4551-ed8d-46ee-9b67-c864a77d6381",
    "external_id": "your_external_id",
    "data": {
        "errors": [ // Details of the error that occurred
            {
              "code": "service_unavailable",
              "message": "Belvo is unable to process the request due to an internal system issue or to an unsupported response from an institution"
            }
        ]
    }
}
Webhook retry policy
If Belvo initially calls your server and does not receive a 2xx HTTP status code, we will retry five times using a linear backoff to allow your server to recover from any malfunction.
Webhook Best Practices
Respond to webhooks
As soon as you receive a webhook from Belvo, make sure that you respond with 2XX HTTP status code. If we do not receive a 2XX response from your server, we will retry five times using a linear backoff to allow the your server to recover from any malfunction.
Whitelist outbound IP addresses
You can receive webhook events from the following IP addresses:
3.130.254.4618.220.61.18618.223.45.212
We highly recommend you whitelist these IP addresses so that you can receive webhook events.
Testing webhook events
You can trigger any webhook event type (including link events) from your Belvo Dashboard. Once triggered, you will receive a payload with dummy data. This is an excellent way to test if you can receive webhooks, that you have correctly set up your authentication (if necessary), and act upon the various event types.
To trigger an event:
- From the Environment Switcher in your Belvo dashboard, select the environment you want to test your webhook in.
- Select the Webhooks tab.
- Click on the drop-down menu next to the Sandbox webhook URL you want to test.
- Select the webhook event type you want. This sends the webhook.
- Expand the status box to see details of the webhook event.
Updated 7 months ago